With Ranger
This page explains additional steps for using Ranger for authorization in Hive on MR3. Using Ranger for authorization has the following prerequisite:
- A database server for Ranger is running. It may be the same database server for Metastore. In our example, we assume a MySQL database.
If install.sh was not executed while installing Hive on MR3,
manually create symbolic links to the two directories kubernetes/ranger-conf and kubernetes/ranger-key.
ln -s ../../kubernetes/ranger-conf/ ranger/conf
ln -s ../../kubernetes/ranger-key/ ranger/key
The file ranger/values.yaml defines the default values for the Helm chart.
Typically the user creates another YAML file to override some of these default values.
In our example, we create a new YAML file ranger/values-ranger.yaml.
To run Ranger, we need to check or update the following files.
├── hive/conf
│   ├── hive-site.xml
│   ├── ranger-hive-audit.xml
│   └── ranger-hive-security.xml
├── ranger/key
│   ├── install.properties
│   └── solr.in.sh
└── ranger/conf
    ├── core-site.xml
    ├── solr-security.json
    └── ranger-admin-site.xml.append
Basic settings
Create a new file ranger/values-ranger.yaml
and update the following fields
to override the default values in ranger/values.yaml.
vi ranger/values-ranger.yaml

docker:
  image: mr3project/ranger:2.6.0

ranger:
  externalIp: 192.168.10.1

hostAliases:
- ip: "192.168.10.100"
  hostnames:
  - "orange0"
- ip: "192.168.10.1"
  hostnames:
  - "orange1"
docker.imagespecifies the full name of the Docker image including a tag. We use the pre-built Docker imagemr3project/ranger:2.6.0.ranger.externalIpspecifies the host for the Service for exposing Ranger to the outside of the Kubernetes cluster. The user should specify an IP address with a valid host name.hostAliaseslists aliases for hosts that may not be found in the default DNS. Usually it suffices to include three hosts: 1) the host running MySQL for Ranger outside the Kubernetes cluster; 2) the host running HiveServer2 inside the Kubernetes cluster; 3) the host running Ranger inside the Kubernetes cluster. In our example,orange0is the host running MySQL for Ranger andorange1is the host name assigned to HiveServer2 and Ranger.
PersistentVolumeClaim
Ranger uses the PersistentVolumeClaim workdir-pvc created for Hive on MR3.
The PersistentVolume should be writable to user nobody (corresponding to root user).
To use a local directory inside the Docker container instead
(e.g., if PersistentVolumeClaim is not created for Hive on MR3),
set the field workDir.use to false.
vi ranger/values-ranger.yaml

workDir:
  use: false
hive/conf/hive-site.xml
The following configuration keys should be set to use Ranger for authorization in HiveServer2.
vi hive/conf/hive-site.xml

<property>
  <name>hive.security.authenticator.manager</name>
  <value>org.apache.hadoop.hive.ql.security.SessionStateUserAuthenticator</value>
</property>

<property>
  <name>hive.security.authorization.manager</name>
  <value>org.apache.ranger.authorization.hive.authorizer.RangerHiveAuthorizerFactory</value>
</property>
hive/conf/ranger-hive-audit.xml
The configuration key xasecure.audit.destination.solr.urls should use the host name assigned to Ranger.
vi hive/conf/ranger-hive-audit.xml

  <property>
    <name>xasecure.audit.destination.solr.urls</name>
    <value>http://orange1:6083/solr/ranger_audits</value>
  </property>
hive/conf/ranger-hive-security.xml
The configuration key ranger.plugin.hive.service.name should use the Ranger service for HiveServer2.
The configuration key ranger.plugin.hive.policy.rest.url should use the host name assigned to Ranger.
vi hive/conf/ranger-hive-security.xml

  <property>
    <name>ranger.plugin.hive.service.name</name>
    <value>ORANGE_hive</value>
  </property>

  <property>
    <name>ranger.plugin.hive.policy.rest.url</name>
    <value>http://orange1:6080</value>
  </property>
ranger/key/install.properties
vi ranger/key/install.properties

DB_FLAVOR=MYSQL
SQL_CONNECTOR_JAR=/opt/mr3-run/lib/mysql-connector-java-8.0.28.jar

db_root_user=root
db_root_password=passwd
db_host=192.168.10.100

db_password=password

rangerAdmin_password=rangeradmin1

audit_solr_urls=http://orange1:6083/solr/ranger_audits
audit_solr_user=
audit_solr_password=

policymgr_external_url=http://orange1:6080
policymgr_http_enabled=true
DB_FLAVORandSQL_CONNECTOR_JARshould match the database connector jar file.db_root_useranddb_root_passwordshould be set to the ID and password of the root user of MySQL for Ranger.db_hostshould be set to the IP address or the host name of the MySQL database for Ranger.db_passwordspecifies a password for the userrangeradminwhich is use only internally by Ranger.rangerAdmin_passwordspecifies the initial password for the useradminon the Ranger Admin UI.audit_solr_urlsspecifies the address for the configuration keyranger.audit.solr.urls.- Set to empty or remove two variables
audit_solr_userandaudit_solr_passwordrelated to authentication for auditing. policymgr_external_urlshould be set to the Ranger admin URL.policymgr_http_enabledshould be set to true.
When using a MySQL server,
Ranger automatically downloads a MySQL connector
from https://cdn.mysql.com/Downloads/Connector-J/mysql-connector-java-8.0.28.tar.gz.
The user should check the compatibility between the server and the connector.
For example,
a MySQL server created with a Docker image 5.7.37-0ubuntu0.18.04.1
is not fully compatible.
ranger/key/solr.in.sh
vi ranger/key/solr.in.sh

SOLR_SSL_ENABLED=false

SOLR_AUTH_TYPE="basic"
SOLR_AUTHENTICATION_OPTS="-Dbasicauth=solr:solrRocks"
- Set
SOLR_SSL_ENABLEDto false because we do not use SSL for Solr. - Set
SOLR_AUTH_TYPEandSOLR_AUTHENTICATION_OPTSas shown above because we do not use Kerberos for Solr.
ranger/conf/core-site.xml
Set the configuration key hadoop.security.authentication to simple to disable Kerberos authentication.
vi ranger/conf/core-site.xml

  <property>
    <name>hadoop.security.authentication</name>
    <value>simple</value>
  </property>
ranger/conf/solr-security.json
Set the configuration for authentication and authorization in Solr as follows.
vi ranger/conf/solr-security.json

{
  "authentication": {
    "blockUnknown": false,
    "class": "solr.BasicAuthPlugin",
    "credentials":{
      "solr":"IV0EHq1OnNrj6gvRCwvFwTrZ1+z1oBbnQdiVC3otuq0= Ndd7LKvVBAaZIF0QAVi1ekCfAJXr1GGfLtRUXhgrF8c="
    }
  },
  "authorization": {
    "class": "solr.RuleBasedAuthorizationPlugin"
  }
}
ranger/conf/ranger-admin-site.xml.append
If Kerberos is not used, clear the contents except the last line.
vi ranger-conf/ranger-admin-site.xml.append

</configuration>
Running Ranger
Assuming that
a new YAML file ranger/values-ranger.yaml
overrides the default values in ranger/values.yaml,
the user can run Ranger with namespace hivemr3 as follows.
helm install --namespace hivemr3 ranger -f ranger/values-ranger.yaml
2025/03/22 17:55:22 found symbolic link in path: /home/gitlab-runner/mr3-prep/helm/ranger/conf resolves to /home/gitlab-runner/mr3-prep/kubernetes/ranger-conf
2025/03/22 17:55:22 found symbolic link in path: /home/gitlab-runner/mr3-prep/helm/ranger/key resolves to /home/gitlab-runner/mr3-prep/kubernetes/ranger-key
NAME:   wishful-marsupial
LAST DEPLOYED: Sat Mar 22 22:46:15 2025
NAMESPACE: hivemr3
STATUS: DEPLOYED
...
Then the user can execute Metastore and HiveServer2.
Creating a Ranger service
After running Ranger, the user can check if Ranger has started properly.
kubectl logs -n hivemr3 hivemr3-ranger-0 -c ranger
...
Installation of Ranger PolicyManager Web Application is completed.
Starting Apache Ranger Admin Service
Apache Ranger Admin Service with pid 1696 has started.
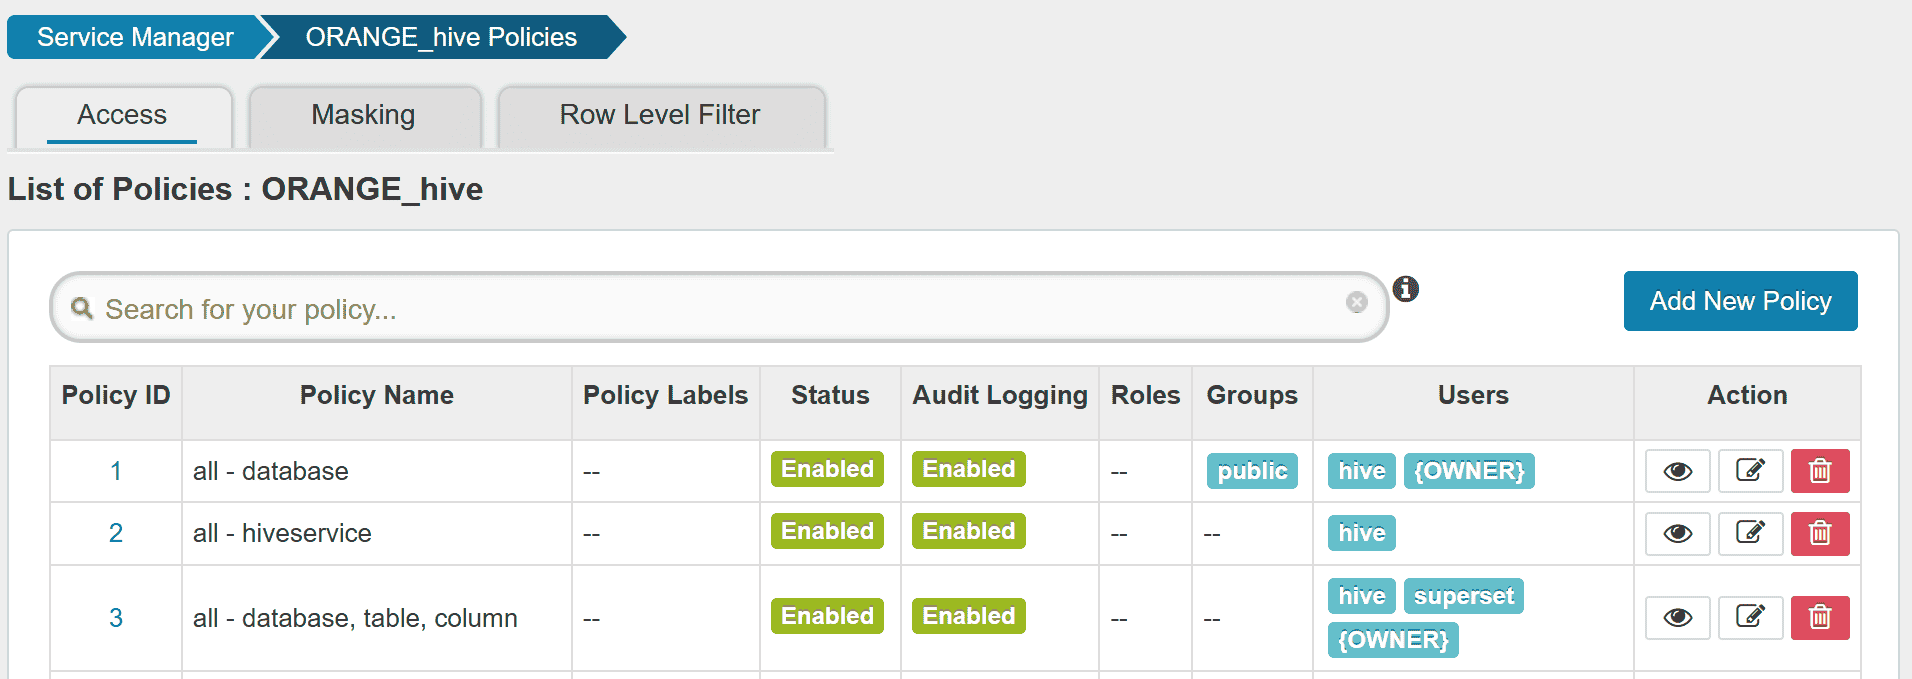
Before executing queries,
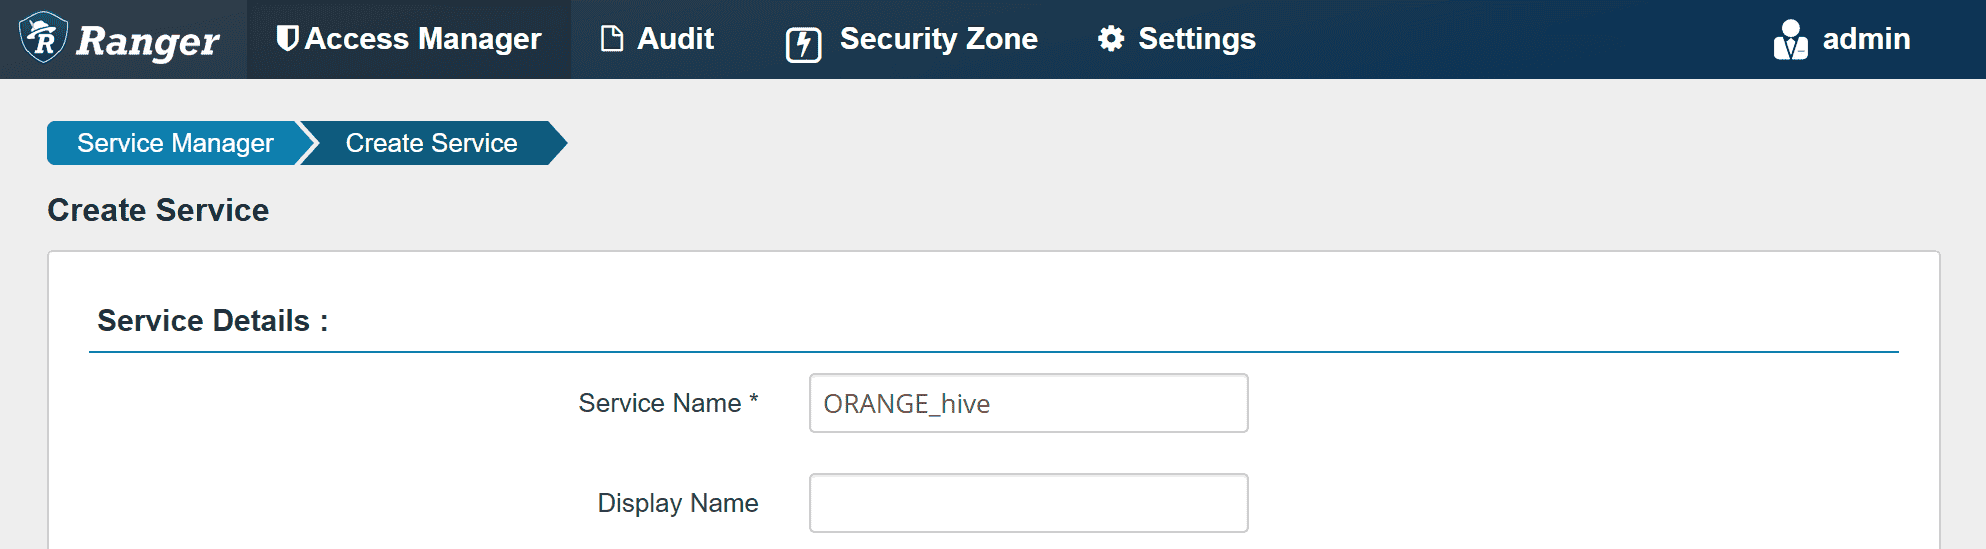
the user should create a new Ranger service ORANGE_hive
(if it is not available yet).
The user can access Ranger Admin UI at http://orange1:6080
(specified by policymgr_external_url in ranger-key/install.properties).
Login to Ranger Admin UI with user admin and password rangeradmin1.
Create a Ranger service ORANGE_hive.
In Config Properties,
fill the JDBC URL field with:
jdbc:hive2://orange1:9852/
policy.download.auth.users should be set to the user hive, or the owner of HiveServer2.
Then Ranger can inspect metadata (such as databases, tables, users) managed by HiveServer2
while HiveServer2 can retrieve its Ranger service profile.
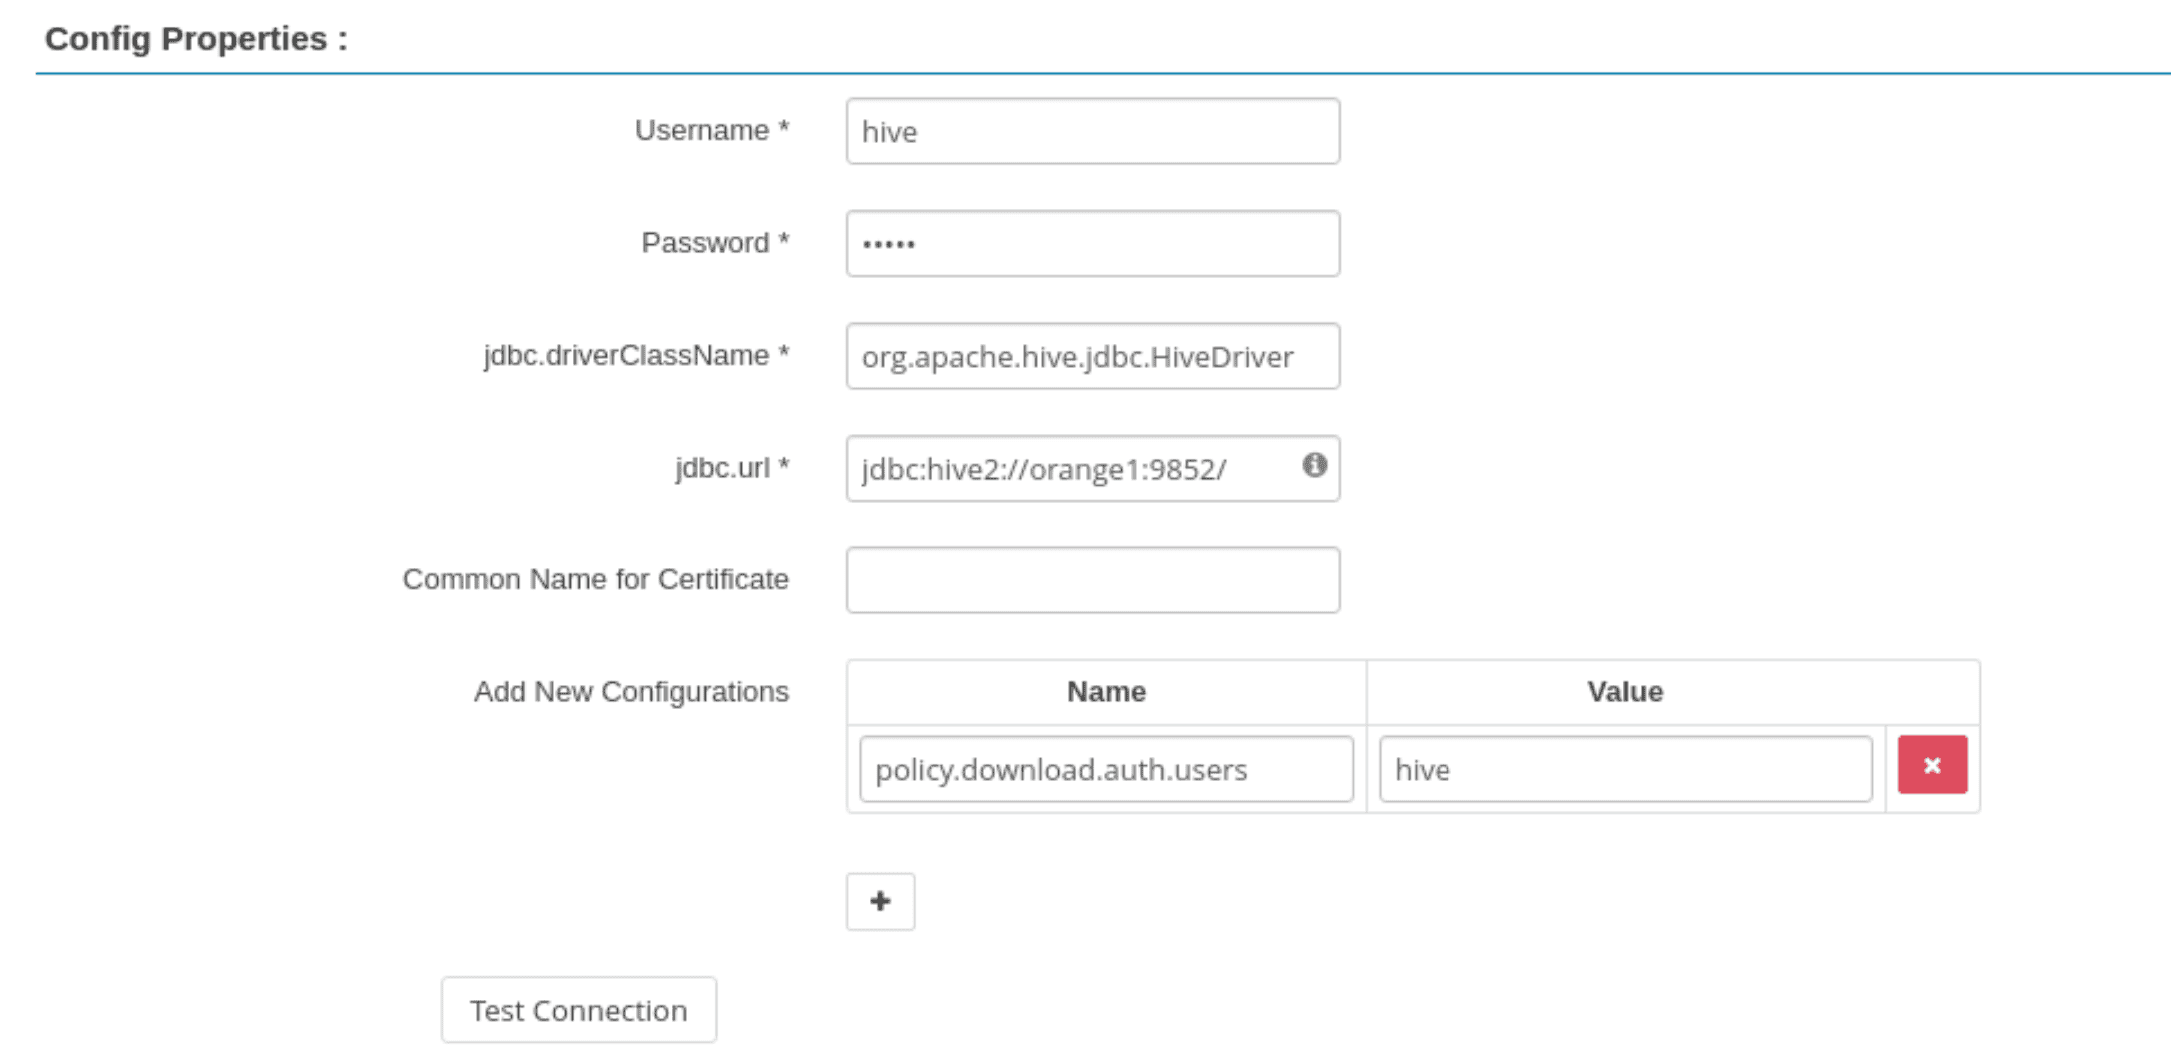
While creating the Ranger service,
the Test Connection button fails because HiveServer2 is unaware of it.
After creating the Ranger service, the button should work.
After creating the Ranger service,
HiveServer2 successfully downloads the policy for ORANGE_hive.
kubectl logs -n hivemr3 hivemr3-hiveserver2-54bfbd664d-cwzd9
...
2025-03-22T13:48:12,788  INFO [main] policyengine.RangerPolicyRepository: This policy engine contains 8 policy evaluators
...
As the last step before executing queries,
new users should be added to the Ranger policy.
For example, we can add a new user superset to allow Superset.