Shell Scripts
This page shows how to use a pre-built Docker image available at DockerHub in order to operate Hive on MR3 on Kubernetes with multiple nodes. By following the instructions, the user will learn:
- how to start Metastore
- how to run Hive on MR3
After installing Hive on MR3,
change to the directory kubernetes.
cd kubernetes/
Overview
Hive on MR3 consists of four components: Metastore, HiveServer2, MR3 DAGAppMaster, and MR3 ContainerWorkers. The MR3 release can create additional components shown in the following diagram.
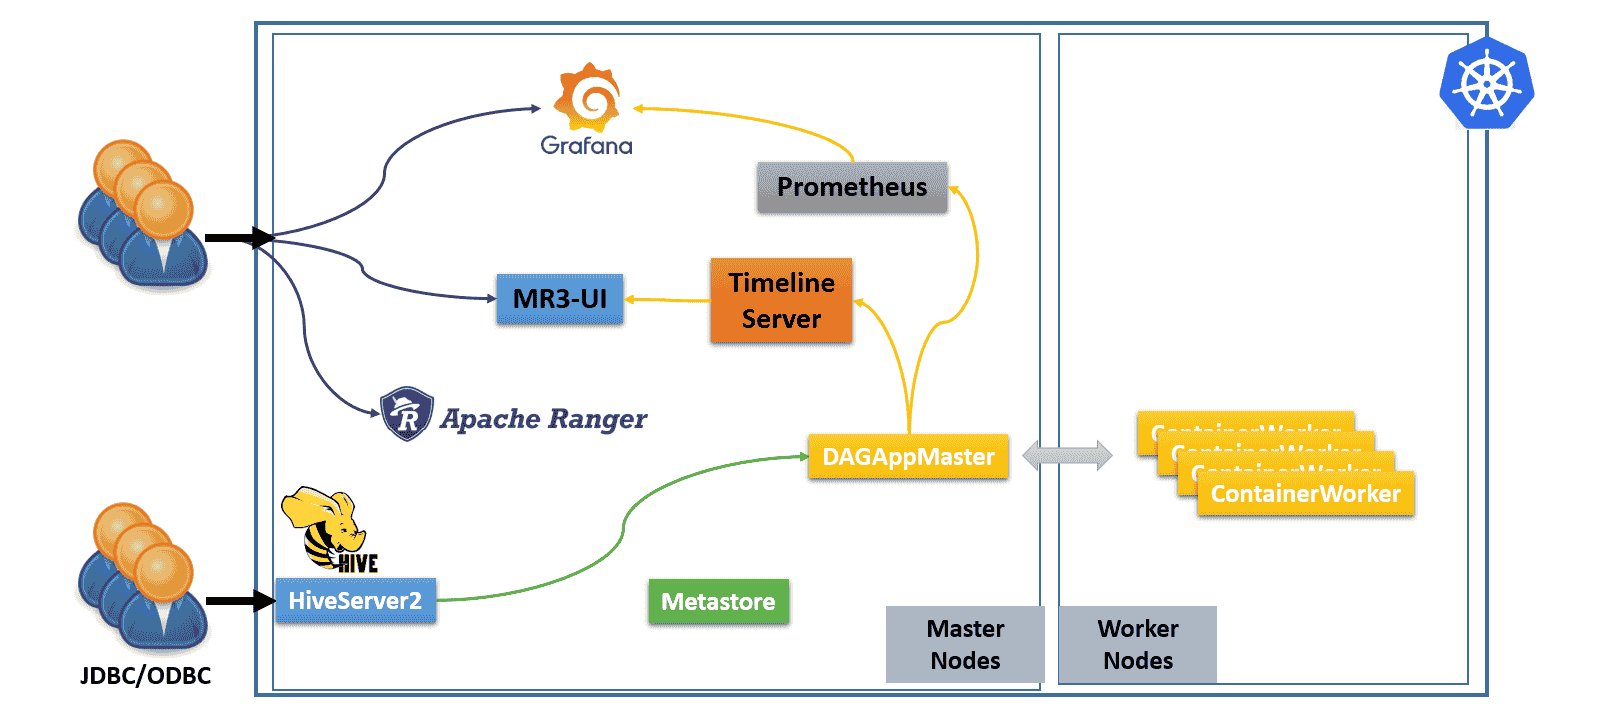
- The user can connect to HiveServer2 (via JDBC/ODBC) which is exposed to the outside of the Kubernetes cluster.
- The user can connect directly to MR3-UI, Grafana, and Ranger.
- Internally we run a Prometheus server to collect metrics from DAGAppMaster.
- A Timeline Server is embedded in DAGAppMaster to collect history logs.
Hive on MR3 requires three types of storage:
- Data source such as HDFS or S3
- Either PersistentVolume or HDFS/S3 for storing transient data
- hostPath volumes for storing intermediate data in ContainerWorker Pods
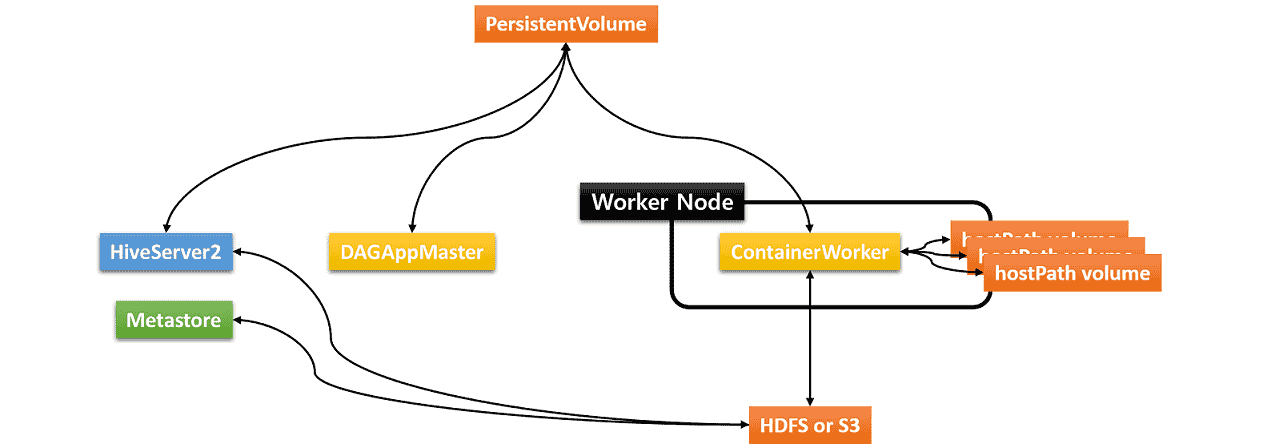
The hostPath volumes are mounted at runtime in each ContainerWorker Pod. These hostPath volumes hold intermediate data to be shuffled between ContainerWorker Pods. In order to be able to mount the same set of hostPath volumes in every ContainerWorker Pod, an identical set of local directories should be ready in all worker nodes (where ContainerWorker Pods are created). For the sake of performance, all the local directories should reside on different local disks.
Running Hive on MR3 involves the following steps.
- The user updates
env.shto set additional environment variables. - The user updates
yamlfiles in the directoryyaml. - The user updates
hive-site.xml,mr3-site.xml, andtez-site.xmlin the configuration directoryconf. - The user executes
run-metastore.shandrun-hive.shto start Metastore and HiveServer2. A DAGAppMaster Pod is created by HiveServer2, and ContainerWorker Pods are created by DAGAppMaster.
In the third step,
updating hive-site.xml and mr3-site.xml is usually enough to get started
as the default values in tez-site.xml work well in common settings.
Configuring env.sh for Metastore
env.sh is a self-descriptive script containing
major environment variables that should be set in every environment.
Open env.sh and set the following environment variables.
vi env.sh

HIVE_DATABASE_HOST=192.168.10.1
HIVE_DATABASE_NAME=hivemr3
HIVE_WAREHOUSE_DIR=s3a://hivemr3/warehouse
HIVE_METASTORE_DB_TYPE=mysql
- Set
HIVE_DATABASE_HOSTto the IP address of the MySQL server for Metastore. In our example, the MySQL server is running at the IP address192.168.10.1. - Set
HIVE_DATABASE_NAMEto the database name for Metastore in the MySQL server. - Set
HIVE_WAREHOUSE_DIRto the HDFS directory or the S3 bucket storing the warehouse (e.g.,hdfs://hdfs.server:8020/hive/warehouseors3a://hivemr3/hive/warehouse). Note that for using S3, we should use prefixs3a, nots3. - Set
HIVE_METASTORE_DB_TYPEto the database type for Metastore which is used as an argument toschematool(mysqlfor MYSQL,postgresfor PostgreSQL,mssqlfor MS SQL).
Docker image
We use a pre-built Docker image available at DockerHub.
Open env.sh and set the following environment variables.
DOCKER_HIVE_IMGspecifies the Docker image for MR3 DAGAppMaster Pod.DOCKER_HIVE_WORKER_IMGspecifies the Docker image for MR3 ContainerWorker Pod.
vi env.sh

DOCKER_HIVE_IMG=mr3project/hive:4.0.0.mr3.2.4
DOCKER_HIVE_WORKER_IMG=$DOCKER_HIVE_IMG
In yaml/metastore.yaml and yaml/hive.yaml,
set the filed image to the Docker image for Metastore and HiveServer2 Pods.
vi yaml/metastore.yaml

spec:
  template:
    spec:
      containers:
      - image: mr3project/hive:4.0.0.mr3.2.4
vi yaml/hive.yaml

spec:
  template:
    spec:
      containers:
      - image: mr3project/hive:4.0.0.mr3.2.4
Resources for Metastore and HiveServer2 Pods
Open env.sh and
set the following environment variables to
the memory size (in MB) to be allocated to HiveServer2 and Metastore Pods.
HIVE_SERVER2_HEAPSIZEshould match the memory size for HiveServer2 Pod.HIVE_METASTORE_HEAPSIZEshould match the memory size for Metastore Pod.
In our example, we use the following values.
vi env.sh

HIVE_SERVER2_HEAPSIZE=16384           # HiveServer2 Pod memory in MB
HIVE_METASTORE_HEAPSIZE=16384         # Metastore Pod memory in MB
Open yaml/metastore.yaml and set the resources to match HIVE_METASTORE_HEAPSIZE in env.sh.
vi yaml/metastore.yaml

      containers:
        resources:
          requests:
            cpu: 4
            memory: 16Gi
          limits:
            cpu: 4
            memory: 16Gi
Open yaml/hive.yaml and set the resources to match HIVE_SERVER2_HEAPSIZE.
vi yaml/hive.yaml

      containers:
        resources:
          requests:
            cpu: 4
            memory: 16Gi
          limits:
            cpu: 4
            memory: 16Gi
Resources for DAGAppMaster Pod
By default, we allocate 16GB of memory and 4 CPUs to a DAGAppMaster Pod.
To adjust resources, update conf/mr3-site.xml.
vi conf/mr3-site.xml

<property>
  <name>mr3.am.resource.memory.mb</name>
  <value>16384</value>
</property>

<property>
  <name>mr3.am.resource.cpu.cores</name>
  <value>4</value>
</property>
Setting host aliases (optional)
To use host names (instead of IP addresses) when configuring Hive on MR3, the user should update:
spec.template.spec.hostAliasesfield inyaml/metastore.yamlandyaml/hive.yaml- configuration key
mr3.k8s.host.aliasesinconf/mr3-site.xml
For example,
if the environment variables HIVE_DATABASE_HOST or HIVE_WAREHOUSE_DIR in env.sh
uses a host name called orange0/orange1 with IP address 192.168.10.100/192.168.10.1,
update as follows.
vi yaml/metastore.yaml

spec:
  template:
    spec:
      hostAliases:
      - ip: "192.168.10.100"
        hostnames:
        - "orange0"
      - ip: "192.168.10.1"
        hostnames:
        - "orange1"
vi yaml/hive.yaml

spec:
  template:
    spec:
      hostAliases:
      - ip: "192.168.10.100"
        hostnames:
        - "orange0"
      - ip: "192.168.10.1"
        hostnames:
        - "orange1"
vi conf/mr3-site.xml

<property>
  <name>mr3.k8s.host.aliases</name>
  <value>orange0=192.168.10.100,orange1=192.168.10.1</value>
</property>
Configuring storage for transient data
The user can use either a PersistentVolume or HDFS/S3 to store transient data (e.g., results of running queries to be passed from ContainerWorkers to HiveServer2). To use a PersistentVolume, follow the instruction in 1. Creating and mounting PersistentVolume. To use HDFS/S3, follow the instruction in 2. Using HDFS/S3.
1. Creating and mounting PersistentVolume
The environment variable CREATE_PERSISTENT_VOLUME in env.sh specifies
whether or not to create a PersistentVolume and a corresponding PersistentVolumeClaim.
vi env.sh

CREATE_PERSISTENT_VOLUME=true
Set CREATE_PERSISTENT_VOLUME to false
if a PersistentVolume and a corresponding PersistentVolumeClaim have already been created
(e.g., on Amazon EKS).
The manifest yaml/workdir-pv.yaml defines a PersistentVolume.
The user should update it in order to use a desired type of PersistentVolume.
In our example,
we create a PersistentVolume using NFS,
where the NFS server runs at 192.168.10.1 and uses a directory /home/nfs/hivemr3.
The PersistentVolume should be writable to the user with UID 1000.
vi yaml/workdir-pv.yaml

spec:
  persistentVolumeReclaimPolicy: Delete
  nfs:
    server: "192.168.10.1"
    path: "/home/nfs/hivemr3"
The manifest yaml/workdir-pvc.yaml defines a PersistentVolumeClaim
which references the PersistentVolume created by yaml/workdir-pv.yaml.
The user should specify the size of the storage to be used by Hive on MR3:
vi yaml/workdir-pvc.yaml

spec:
  resources:
    requests:
      storage: 10Gi
2. Using HDFS/S3
As we do not use a PersistentVolume,
set CREATE_PERSISTENT_VOLUME to false in env.sh.
vi env.sh

CREATE_PERSISTENT_VOLUME=false
Set the configuration keys hive.exec.scratchdir and hive.query.results.cache.directory in conf/hive-site.xml to point to the directory on HDFS or S3 for storing transient data.
- The directory on HDFS must be writable to the user running HiveServer2 and have directory permission 733. If it does not exist, HiveServer2 automatically creates a new directory with permission 733.
- To use S3, we should use prefix
s3a, nots3. The configuration keymr3.am.staging.dir.check.ownership.permissionshould be set to false inconf/mr3-site.xmlbecause S3 is an object store which only simulates directories without maintaining ownership and permission.
vi conf/hive-site.xml

<property>
  <name>hive.exec.scratchdir</name>
  <value>s3a://hivemr3/workdir</value>
</property>

<property>
  <name>hive.query.results.cache.directory</name>
  <value>s3a://hivemr3/workdir/_resultscache_</value>
</property>
- Update
hive.repl.rootdironly if the user plans to execute theREPL DUMPcommand. - Do not update
hive.downloaded.resources.dirbecause it should point to a directory on the local file system.
Open env.sh and update the following two environment variables to empty values
because we do not use PersistentVolumes.
Set METASTORE_USE_PERSISTENT_VOLUME to false as well.
vi env.sh

WORK_DIR_PERSISTENT_VOLUME_CLAIM=
WORK_DIR_PERSISTENT_VOLUME_CLAIM_MOUNT_DIR=

METASTORE_USE_PERSISTENT_VOLUME=false
Open yaml/metastore.yaml and comment out the following lines:
vi yaml/metastore.yaml

# - name: work-dir-volume
#   mountPath: /opt/mr3-run/work-dir/

# - name: work-dir-volume
#   persistentVolumeClaim:
#     claimName: workdir-pvc
Open yaml/hive.yaml and comment out the following lines:
vi yaml/hive.yaml

# - name: work-dir-volume
#   mountPath: /opt/mr3-run/work-dir

# - name: work-dir-volume
#   persistentVolumeClaim:
#     claimName: workdir-pvc
Configuring S3 (optional)
To access S3 storage,
additional configuration keys should be set in conf/core-site.xml.
Open conf/core-site.xml and set configuration keys for S3.
The configuration key fs.s3a.endpoint should be set to point to the storage server.
vi conf/core-site.xml

<property>
  <name>fs.s3a.aws.credentials.provider</name>
  <value>com.amazonaws.auth.EnvironmentVariableCredentialsProvider</value>
</property>

<property>
  <name>fs.s3a.endpoint</name>
  <value>http://orange0:9000</value>
</property>

<property>
  <name>fs.s3a.path.style.access</name>
  <value>true</value>
</property>
When using
the class EnvironmentVariableCredentialsProvider to read AWS credentials,
add two environment variables AWS_ACCESS_KEY_ID and AWS_SECRET_ACCESS_KEY in env.sh.
Since env.sh is mounted as a Secret inside Metastore and HiveServer2 Pods,
it is safe to write AWS access key ID and secret access key in kubernetes/env.sh.
vi env.sh

export AWS_ACCESS_KEY_ID=_your_aws_access_key_id_
export AWS_SECRET_ACCESS_KEY=_your_aws_secret_secret_key_
Note that AWS_ACCESS_KEY_ID and AWS_SECRET_ACCESS_KEY are already appended
to the values of the configuration keys mr3.am.launch.env and mr3.container.launch.env in conf/mr3-site.xml.
For the security purpose, the user should NOT write AWS access key ID and secret access key in conf/mr3-site.xml.
vi conf/mr3-site.xml

<property>
  <name>mr3.am.launch.env</name>
  <value>LD_LIBRARY_PATH=$LD_LIBRARY_PATH:/opt/mr3-run/hadoop/apache-hadoop/lib/native,HADOOP_CREDSTORE_PASSWORD,AWS_ACCESS_KEY_ID,AWS_SECRET_ACCESS_KEY,AWS_REGION</value>
</property>

<property>
  <name>mr3.container.launch.env</name>
  <value>LD_LIBRARY_PATH=/opt/mr3-run/hadoop/apache-hadoop/lib/native,HADOOP_CREDSTORE_PASSWORD,AWS_ACCESS_KEY_ID,AWS_SECRET_ACCESS_KEY,AWS_REGION</value>
</property>
Configuring Metastore Pod
Open yaml/metastore.yaml and remove nodeAffinity as we do not use node affinity rules.
vi yaml/metastore.yaml

      affinity:
      # nodeAffinity:
      #   requiredDuringSchedulingIgnoredDuringExecution:
      #     nodeSelectorTerms:
      #     - matchExpressions:
      #       - key: roles
      #         operator: In
      #         values:
      #         - "masters"
By default, Metastore does not initialize schema.
If it is the first time to run Metastore and the user needs to initialize schema,
add --init-schema as an argument.
vi yaml/metastore.yaml

spec:
  template:
    spec:
      containers:
        args: ["start", "--kubernetes", "--init-schema"]
Configuring HiveServer2 Pod
(no further change to yaml/hive.yaml)
Configuring Service for HiveServer2
The manifest yaml/hiveserver2-service.yaml
defines a Service for exposing HiveServer2 to the outside of the Kubernetes cluster.
The user should specify a public IP address for HiveServer2
so that clients can connect to it from the outside of the Kubernetes cluster.
By default, HiveServer2 uses port 9852 for Thrift transport and port 10001 for HTTP transport.
In our example, we expose HiveServer2 at 192.168.10.1.
vi yaml/hiveserver2-service.yaml

spec:
  ports:
  - protocol: TCP
    port: 9852
    targetPort: 9852
    name: thrift
  - protocol: TCP
    port: 10001
    targetPort: 10001
    name: http
  externalIPs:
  - 192.168.10.1
For secure communication using SSL, a valid host name for the public IP address is required.
Configuring MR3 DAGAppMaster and ContainerWorker Pods
As a prerequisite,
every worker node where ContainerWorker Pods may run
should have an identical set of local directories for storing intermediate data.
These directories are mapped to hostPath volumes in each ContainerWorker Pod.
Set the configuration key mr3.k8s.pod.worker.hostpaths to the list of local directories in conf/mr3-site.xml.
vi conf/mr3-site.xml

<property>
  <name>mr3.k8s.pod.worker.hostpaths</name>
  <value>/data1/k8s,/data2/k8s,/data3/k8s</value>
</property>
Configuring security
Update the following configuration keys in conf/hive-site.xml.
- The two configuration keys
javax.jdo.option.ConnectionUserNameandjavax.jdo.option.ConnectionPasswordshould match the user name and password of the MySQL server for Metastore. hive.metastore.pre.event.listenersis set to empty because we do not enable security on the Metastore side.
vi conf/hive-site.xml

<property>
  <name>javax.jdo.option.ConnectionUserName</name>
  <value>root</value>
</property>

<property>
  <name>javax.jdo.option.ConnectionPassword</name>
  <value>passwd</value>
</property>

<property>
  <name>hive.metastore.pre.event.listeners</name>
  <value></value>
</property>
Check the configuration for authentication and authorization:
vi conf/hive-site.xml

<property>
  <name>hive.security.authenticator.manager</name>
  <value>org.apache.hadoop.hive.ql.security.HadoopDefaultAuthenticator</value>
</property>

<property>
  <name>hive.security.authorization.manager</name>
  <value>org.apache.hadoop.hive.ql.security.authorization.plugin.sqlstd.SQLStdConfOnlyAuthorizerFactory</value>
</property>
Configuring resources
In conf/hive-site.xml, the following configuration keys specify
the resource to be allocated to a Map Task, a Reduce Task, or a ContainerWorker.
In our example, we allocate 4GB of memory and a single core to a Map Task and a Reduce Task,
and 16GB of memory and four cores to a ContainerWorker.
vi conf/hive-site.xml

<property>
  <name>hive.mr3.map.task.memory.mb</name>
  <value>4096</value>
</property>

<property>
  <name>hive.mr3.map.task.vcores</name>
  <value>1</value>
</property>

<property>
  <name>hive.mr3.reduce.task.memory.mb</name>
  <value>4096</value>
</property>

<property>
  <name>hive.mr3.reduce.task.vcores</name>
  <value>1</value>
</property>

<property>
  <name>hive.mr3.all-in-one.containergroup.memory.mb</name>
  <value>16384</value>
</property>

<property>
  <name>hive.mr3.all-in-one.containergroup.vcores</name>
  <value>4</value>
</property>
When updating these configuration keys, we should meet the following requirements:
hive.mr3.map.task.memory.mb≤hive.mr3.all-in-one.containergroup.memory.mbhive.mr3.map.task.vcores≤hive.mr3.all-in-one.containergroup.vcoreshive.mr3.reduce.task.memory.mb≤hive.mr3.all-in-one.containergroup.memory.mbhive.mr3.reduce.task.vcores≤hive.mr3.all-in-one.containergroup.vcores
Delete existing ConfigMaps and Services
Before running Metastore and HiveServer2,
make sure that no ConfigMaps and Services exist in the namespace hivemr3.
For example, the user may see ConfigMaps and Services left over from a previous run.
kubectl get configmaps -n hivemr3
NAME                       DATA   AGE
mr3conf-configmap-master   1      16m
mr3conf-configmap-worker   1      16m

kubectl get svc -n hivemr3
NAME                    TYPE        CLUSTER-IP      EXTERNAL-IP   PORT(S)   AGE
service-master-1237-0   ClusterIP   10.105.238.21   <none>        80/TCP    11m
service-worker          ClusterIP   None            <none>        <none>    11m
In such a case, manually delete these ConfigMaps and Services.
kubectl delete configmap -n hivemr3 mr3conf-configmap-master mr3conf-configmap-worker
kubectl delete svc -n hivemr3 service-master-1237-0 service-worker
Running Metastore
To run Metastore, execute the script run-metastore.sh.
Before starting Metastore, the script automatically downloads a MySQL connector
from https://cdn.mysql.com/Downloads/Connector-J/mysql-connector-java-8.0.28.tar.gz
because --init-schema option is passed to Metastore.
./run-metastore.sh
...
CLIENT_TO_AM_TOKEN_KEY=ac37fec2-559b-4970-8191-b7821c57481e
MR3_APPLICATION_ID_TIMESTAMP=6451
MR3_SHARED_SESSION_ID=4c338f6e-c98c-4b67-a0c8-a1ac82e03b95
configmap/client-am-config created
statefulset.apps/hivemr3-metastore created
service/metastore created
After starting Metastore,
the user should remove the argument --init-schema
so as not to inadvertently initialize schema again.
vi yaml/metastore.yaml

spec:
  template:
    spec:
      containers:
        args: ["start", "--kubernetes"]
Running HiveServer2
To run HiveServer2, execute the script run-hive.sh.
./run-hive.sh
...
CLIENT_TO_AM_TOKEN_KEY=49e6ab1a-d62b-40c8-87d5-e7a6bf8ded1c
MR3_APPLICATION_ID_TIMESTAMP=20045
MR3_SHARED_SESSION_ID=9b6fad64-c280-4013-ace2-3c8c7f947166
Error from server (AlreadyExists): configmaps "client-am-config" already exists
deployment.apps/hivemr3-hiveserver2 created
service/hiveserver2 created
These scripts mount the following files inside the Metastore and HiveServer2 Pods:
env.shconf/*
In this way, the user can completely specify the behavior of Metastore and HiveServer2 as well as DAGAppMaster and ContainerWorkers.
In order to make any changes to these files effective,
the user should restart Metastore and HiveServer2
after deleting existing ConfigMaps and Services in the namespace hivemr3.
Executing the script run-hive.sh starts a HiveServer2 Pod and a DAGAppMaster Pod in a moment.
HiveServer2 Pod becomes ready after a readiness probe contacts it.
Depending on the configuration for readiness probe, HiveServer2 may restart once before running normally.
No ContainerWorkers Pods are created until queries are submitted.
kubectl get pods -n hivemr3
NAME                                   READY   STATUS    RESTARTS   AGE
NAME                                  READY   STATUS    RESTARTS   AGE
hivemr3-hiveserver2-8cdc6f486-lsptj   1/1     Running   0          99s
hivemr3-metastore-0                   1/1     Running   0          2m37s
mr3master-6451-0-94ff6dc96-jqs2x      1/1     Running   0          84s
The user can check the log of the DAGAppMaster Pod to make sure that it has started properly.
kubectl logs -f -n hivemr3 mr3master-6451-0-94ff6dc96-jqs2x
...
2025-03-21T09:55:11,519  INFO [DAGAppMaster-1-13] DAGTimeoutHandler$: DAG timeout check: 0 DAGs
2025-03-21T09:55:11,600  INFO [K8sContainerLauncher-2-1] K8sContainerLauncher: Resynchronizing Pod states for appattempt_6451_0000_000000: 0
Running Beeline
The user may use any client program (not necessarily Beeline included in the MR3 release) to connect to HiveServer2
via the Service created with yaml/hiveserver2-service.yaml
(which opens a Thrift port 9852 and an HTTP port 10001 by default).
In our example, we run Beeline inside the Hiveserver2 Pod.
kubectl exec -n hivemr3 -it hivemr3-hiveserver2-8cdc6f486-lsptj -- /bin/bash -c 'export PS1="$ "; exec /bin/bash'
export USER=root
/opt/mr3-run/hive/run-beeline.sh
...
Connecting to jdbc:hive2://hivemr3-hiveserver2-8cdc6f486-lsptj:9852/;;;
Connected to: Apache Hive (version 4.0.0)
Driver: Hive JDBC (version 4.0.0)
Transaction isolation: TRANSACTION_REPEATABLE_READ
Beeline version 4.0.0 by Apache Hive
0: jdbc:hive2://hivemr3-hiveserver2-8cdc6f486>
After executing a few queries, ContainerWorker Pods are created.
kubectl get pods -n hivemr3
NAME                                  READY   STATUS    RESTARTS   AGE
hivemr3-hiveserver2-8cdc6f486-lsptj   1/1     Running   0          4m7s
hivemr3-metastore-0                   1/1     Running   0          5m5s
mr3master-6451-0-94ff6dc96-jqs2x      1/1     Running   0          3m52s
mr3worker-3515-1                      1/1     Running   0          15s
mr3worker-3515-2                      1/1     Running   0          15s
mr3worker-3515-3                      1/1     Running   0          15s
Stopping Hive on MR3
Delete Deployment for HiveServer2.
kubectl -n hivemr3 delete deployment hivemr3-hiveserver2
deployment.apps "hivemr3-hiveserver2" deleted
Deleting Deployment for HiveServer2 does not automatically terminate the DAGAppMaster Pod.
This is a feature, not a bug, which is due to the support of high availability in Hive on MR3.
For example,
after setting environment variable MR3_APPLICATION_ID_TIMESTAMP properly,
executing the script run-hive.sh again attaches the existing DAGAppMaster Pod to the new HiveServer2 Pod.
Delete Deployment for DAGAppMaster.
kubectl delete deployment -n hivemr3 mr3master-6451-0
deployment.apps "mr3master-6451-0" deleted
Deleting DAGAppMaster Pod automatically deletes all ContainerWorker Pods as well.
Delete StatefulSet for Metastore.
kubectl -n hivemr3 delete statefulset hivemr3-metastore
statefulset.apps "hivemr3-metastore" deleted
After a while, no Pods should be running in the namespace hivemr3.
To delete all remaining resources, execute the following command:
kubectl -n hivemr3 delete configmap --all; kubectl -n hivemr3 delete svc --all; kubectl -n hivemr3 delete secret --all; kubectl -n hivemr3 delete serviceaccount --all; kubectl -n hivemr3 delete role --all; kubectl -n hivemr3 delete rolebinding --all; kubectl delete clusterrole node-reader; kubectl delete clusterrolebinding hive-clusterrole-binding; kubectl -n hivemr3 delete persistentvolumeclaims workdir-pvc; kubectl delete persistentvolumes workdir-pv