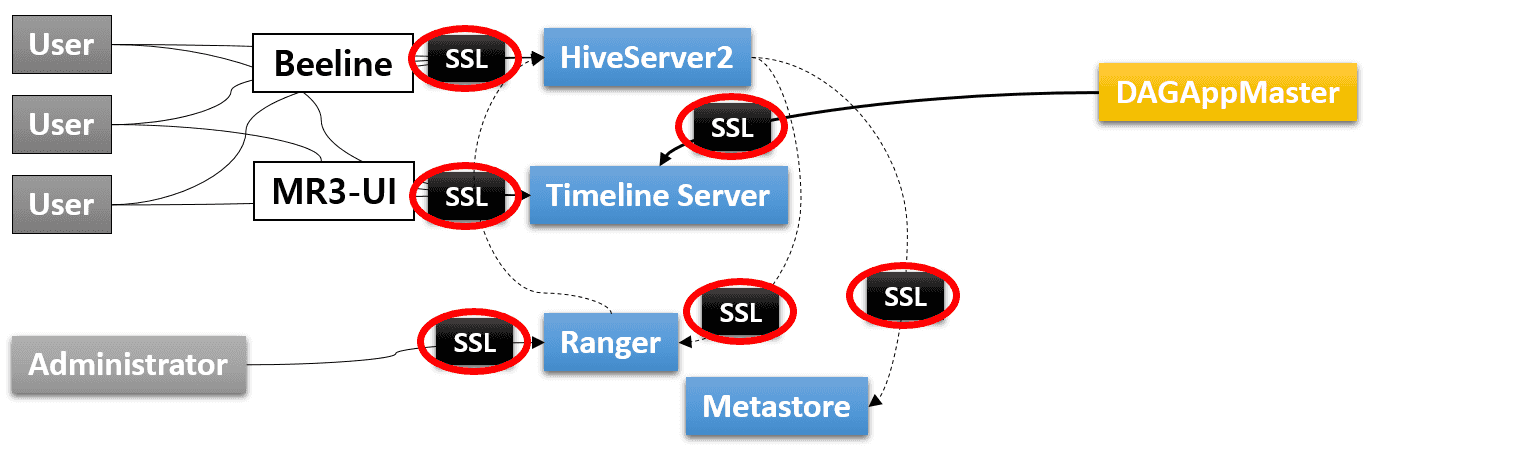
The default settings in the MR3 release do not use SSL (Secure Sockets Layer) for communication between the components of Hive on MR3. Below we illustrate how to enable SSL for communication in a Kubernetes cluster. In the new settings, we use four SSL certificates. For MySQL and KMS, the SSL certificates should be provided by the administrator user. The two SSL certificates for MySQL can be merged if Ranger and Metastore share a common MySQL database.
- Self-signed SSL certificate for secure communication with internal components of Hive on MR3
(HiveServer2, Timeline Server, Ranger, and Metastore).
We will use the script
kubernetes/generate-hivemr3-ssl.shto generate this SSL certificate. - SSL certificate for MySQL for Ranger
- SSL certificate for MySQL for Metastore
- SSL certificate for KMS (Hadoop key management server)
The resultant Kubernetes cluster is depicted in the following diagram:
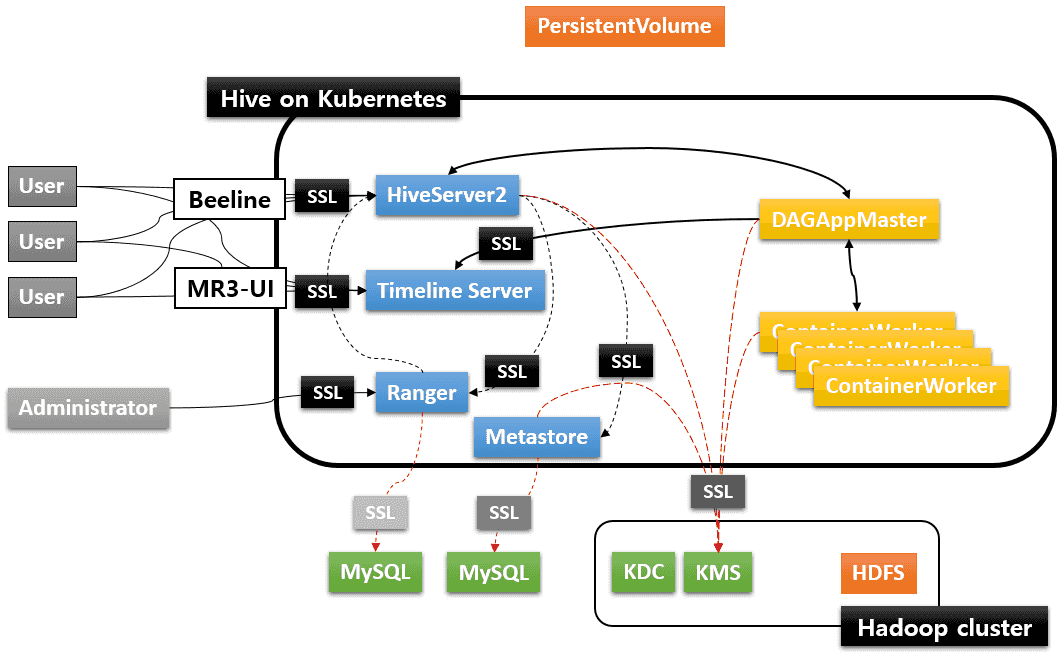
In order to construct the Kubernetes cluster with SSL enabled, the user needs the following certificate files:

In the end, the user will create several KeyStore files (for Beeline and all the components of Hive on MR3), and configure MySQL for Ranger, MySQL for Metastore, and KMS as depicted in the following diagram:
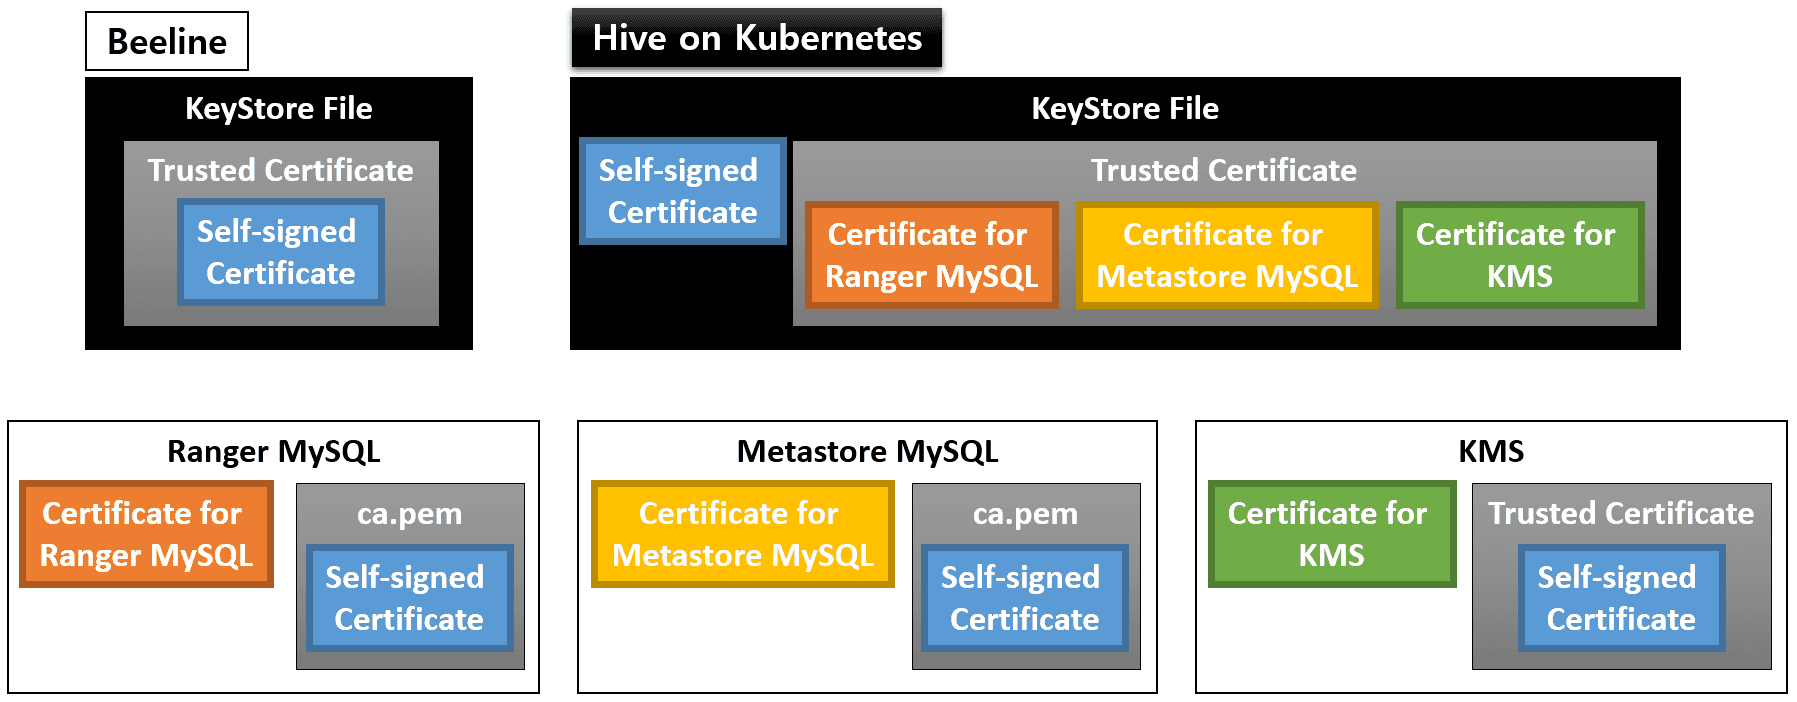
Here we assume that impersonation is not used, so we do not add the certificate for Metastore MySQL to the KeyStore file for KMS.
Self-signed certificate for SSL
The first step is to generate a self-signed certificate for SSL.
In kubernetes/config-run.sh, the user enables SSL by setting ENABLE_SSL and ENABLE_SSL_RANGER, and
specifies 1) a private key KeyStore file (mr3-ssl.jks) and 2) a credential file for the KeyStore (mr3-ssl.jceks).
The user should specify
the host names for HiveServer2 Service (whose IP address is specified in kubernetes/yaml/hiveserver2-service.yaml),
Timeline Server Service (whose IP address is specified in kubernetes/yaml/ats-service.yaml),
Ranger Service (whose IP address is specified in kubernetes/yaml/ranger-service.yaml),
Metastore Pod, KMS, and optionally MySQL database.
The host name for Metastore Pod contains the namespace (hivemr3) in the middle (not in its prefix).
$ vi kubernetes/config-run.sh

ENABLE_SSL=true
ENABLE_SSL_RANGER=true

MR3_SSL_KEYSTORE=/home/hive/mr3-run/kubernetes/mr3-ssl.jks
MR3_SSL_CREDENTIAL_PROVIDER=/home/hive/mr3-run/kubernetes/mr3-ssl.jceks
MR3_SSL_CREDENTIAL_PROVIDER_CHECKSUM=/home/hive/mr3-run/kubernetes/.mr3-ssl.jceks.crc

HIVE_SERVER2_HOST=indigo20
ATS_HOST=indigo20
RANGER_HOST=indigo20
HIVE_METASTORE_HOST=hivemr3-metastore-0.metastore.hivemr3.svc.cluster.local
KMS_HOST=red0
MYSQL_HOST=red0
Before executing the script kubernetes/generate-hivemr3-ssl.sh,
change the Common Name for a private key KeyStore file in the function generate_keystore
so that it matches the host name in the service principal specified by HIVE_SERVER2_KERBEROS_PRINCIPAL in kubernetes/env.sh.
For example,
if HIVE_SERVER2_KERBEROS_PRINCIPAL is set to root/mr3@PL,
the Common Name should be set to mr3.
    keytool -genkeypair -alias ssl-private-key -keyalg RSA -dname "CN=mr3" -keypass $PASSWORD \
      -ext san=$SUBJECT_ALTERNATIVE_NAME -validity $VALID_DAYS -storetype jks -keystore $MR3_SSL_KEYSTORE \
      -storepass $PASSWORD
This step is necessary in order to use a Python client for connecting to HiveServer2 that runs with SSL enabled.
Execute the script kubernetes/generate-hivemr3-ssl.sh to generate a private key KeyStore file and a credential file.
$ kubernetes/generate-hivemr3-ssl.sh
Generated keystore password: 4b41c3e6-7614-4d92-8a4b-d38b1a58831d
...

# Generating a keystore (/home/gla/mr3-run/kubernetes/mr3-ssl.jks) #

Warning:
The JKS keystore uses a proprietary format. It is recommended to migrate to PKCS12 which is an industry standard format using "keytool -importkeystore -srckeystore /home/gla/mr3-run/kubernetes/mr3-ssl.jks -destkeystore /home/gla/mr3-run/kubernetes/mr3-ssl.jks -deststoretype pkcs12".

# Generating a credential file (/home/gla/mr3-run/kubernetes/mr3-ssl.jceks) #
ssl.server.keystore.password has been successfully created.
org.apache.hadoop.security.alias.JavaKeyStoreProvider has been updated.
ssl.server.keystore.keypassword has been successfully created.
org.apache.hadoop.security.alias.JavaKeyStoreProvider has been updated.
keyStoreAlias has been successfully created.
...
Now the user can list three new files:
$ ls kubernetes/mr3-ssl.* kubernetes/.mr3-ssl.jceks.crc
kubernetes/mr3-ssl.jceks  kubernetes/.mr3-ssl.jceks.crc  kubernetes/mr3-ssl.jks
The script prints a password unique to the new KeyStore file (4b41c3e6-7614-4d92-8a4b-d38b1a58831d in the above example).
The user should set a few variables in the following files to this password:
kubernetes/config-run.shfor generating TrustStore filesMR3_SSL_KEYSTORE_PASSWORD=4b41c3e6-7614-4d92-8a4b-d38b1a58831dkubernetes/env.shfor HiveServer2HIVE_SERVER2_SSL_TRUSTSTOREPASS=4b41c3e6-7614-4d92-8a4b-d38b1a58831d export HADOOP_CREDSTORE_PASSWORD=4b41c3e6-7614-4d92-8a4b-d38b1a58831dIn addition, append
HADOOP_CREDSTORE_PASSWORDto the values of the configuration keysmr3.am.launch.envandmr3.container.launch.envinkubernetes/conf/mr3-site.xml. Note that for the security purpose, the user should NOT write the password itself. Just appending the string suffices because MR3 automatically sets the environment variable by reading from the system environment.$ vi kubernetes/conf/mr3-site.xml <property> <name>mr3.am.launch.env</name> <value>LD_LIBRARY_PATH=$LD_LIBRARY_PATH:$HADOOP_HOME/lib/native/,HADOOP_CREDSTORE_PASSWORD,AWS_ACCESS_KEY_ID,AWS_SECRET_ACCESS_KEY,USE_JAVA_17</value> </property> <property> <name>mr3.container.launch.env</name> <value>LD_LIBRARY_PATH=/opt/mr3-run/hadoop/apache-hadoop/lib/native,HADOOP_CREDSTORE_PASSWORD,AWS_ACCESS_KEY_ID,AWS_SECRET_ACCESS_KEY,USE_JAVA_17</value> </property>kubernetes/ranger-key/install.propertiesfor Rangerjavax_net_ssl_keyStorePassword=4b41c3e6-7614-4d92-8a4b-d38b1a58831d javax_net_ssl_trustStorePassword=4b41c3e6-7614-4d92-8a4b-d38b1a58831dkubernetes/ranger-key/solr.in.shfor RangerSOLR_SSL_KEY_STORE_PASSWORD=4b41c3e6-7614-4d92-8a4b-d38b1a58831d SOLR_SSL_TRUST_STORE_PASSWORD=4b41c3e6-7614-4d92-8a4b-d38b1a58831d
Finally use the private key KeyStore file mr3-ssl.jks and the password generated by kubernetes/generate-hivemr3-ssl.sh
to create a new certificate file mr3-ssl.pem which can be safely distributed to all the other components.
$ pwd
/home/gla/mr3-run/kubernetes
$ keytool -export -keystore mr3-ssl.jks -alias ssl-private-key -file mr3-ssl.cert -storepass 4b41c3e6-7614-4d92-8a4b-d38b1a58831d
Certificate stored in file <mr3-ssl.cert>

Warning:
The JKS keystore uses a proprietary format. It is recommended to migrate to PKCS12 which is an industry standard format using "keytool -importkeystore -srckeystore mr3-ssl.jks -destkeystore mr3-ssl.jks -deststoretype pkcs12".
$ openssl x509 -inform der -in mr3-ssl.cert -out mr3-ssl.pem
Ranger with SSL

In order to run Ranger 2.1 with SSL, Kerberos should be used for authentication.
Running Ranger with SSL has the following prerequisites:
- A MySQL database with SSL.
The MySQL database should be compatible with the MySQL connector jar file that
is specified by
HIVE_MYSQL_DRIVERinenv.shand installed when building a Docker image fromkubernetes/ranger/Dockerfile. For the purpose of testing, the user can quickly create such a MySQL database (which automatically enables SSL) as follows:$ docker run -d --name mysql-server -p 3306:3306 -e MYSQL_ROOT_PASSWORD=passwd mysql:5.7 - The certificate file for connecting to the MySQL database.
Typically the certificate file is
/var/lib/mysql/ca.pemor/var/lib/mysql/ssl/ca.pemon the node where MySQL is running. - The user should be able to edit the certificate file for MySQL and restart MySQL.
Ranger with SSL – 1. Certificates for SSL
The user should make a copy of the certificate file for connecting to the MySQL database for Ranger and set MR3_RANGER_MYSQL_CERTIFICATE in kubernetes/config-run.sh to point to the copy.
MR3_RANGER_MYSQL_CERTIFICATE=/home/hive/mr3-run/kubernetes/mr3-ranger-mysql.cert

Now Ranger is ready to connect to the MySQL database securely.
Then the user should extend the certificate file for MySQL (on the node where MySQL is running) so that MySQL can trust the self-signed certificate of Ranger.
Append the contents of mr3-ssl.pem to the certificate file for MySQL (on the node where MySQL is running).
$ cat >> /var/lib/mysql/ca.pem
-----BEGIN CERTIFICATE-----
MIIC4DCCAcigAwIBAgIEApwQbTANBgkqhkiG9w0BAQsFADAWMRQwEgYDVQQDEwto
...
tO1G8uO6bz/AOExeN3nrxMpuTzw=
-----END CERTIFICATE-----
Usually appending the contents of mr3-ssl.pem is necessary only for two-way authentication, but depending on the version of MySQL, it may be necessary even for one-way authentication.
Ranger with SSL – 2. Configurations for SSL
Configuring Ranger to use SSL requires the user to edit several files. The new configurations are about: 1) enabling SSL; 2) specifying the password; 3) specifying HTTPS addresses.
In kubernetes/ranger-key/install.properties, enable SSL.
db_ssl_auth_type can be set to 1-way in order to use one-way authentication.
audit_solr_urls should be set to the HTTPS address for Solr,
and policymgr_external_url should be set to the HTTPS address for Ranger.
$ vi kubernetes/ranger-key/install.properties

db_ssl_enabled=true
db_ssl_required=true
db_ssl_verifyServerCertificate=true
db_ssl_auth_type=2-way

audit_solr_urls=https://indigo20:6083/solr/ranger_audits

policymgr_external_url=https://indigo20:6182
policymgr_http_enabled=false
In kubernetes/ranger-key/solr.in.sh, enable SSL for Solr.
$ vi kubernetes/ranger-key/solr.in.sh

SOLR_SSL_ENABLED=true

SOLR_SSL_KEY_STORE=/opt/mr3-run/ranger/key/hivemr3-ssl-certificate.jks
SOLR_SSL_TRUST_STORE=/opt/mr3-run/ranger/key/hivemr3-ssl-certificate.jks
SOLR_SSL_NEED_CLIENT_AUTH=false
SOLR_SSL_WANT_CLIENT_AUTH=false
SOLR_SSL_CHECK_PEER_NAME=true
SOLR_SSL_KEY_STORE_TYPE=JKS
SOLR_SSL_TRUST_STORE_TYPE=JKS
Since Ranger now uses SSL, HiveServer2 should also be reconfigured so as to communicate with Ranger securely.
In kubernetes/conf/ranger-hive-security.xml, specify the HTTPS address for Ranger.
$ vi kubernetes/conf/ranger-hive-security.xml

<property>
  <name>ranger.plugin.hive.policy.rest.url</name>
  <value>https://indigo20:6182</value>
</property>
In kubernetes/conf/ranger-hive-audit.xml, specify the HTTPS address for Solr.
$ vi kubernetes/conf/ranger-hive-audit.xml

<property>
  <name>xasecure.audit.destination.solr.urls</name>
  <value>https://indigo20:6083/solr/ranger_audits</value>
</property>
Timeline Server with SSL

As the user has already generated a self-signed certificate for SSL in the previous step, running Timeline Server with SSL has no particular prerequisite. The user only needs to update a few configuration files before starting Timeline Server.
kubernetes/ats-conf/core-site.xml should be configured to use the KeyStore file.
$ vi kubernetes/ats-conf/core-site.xml

<property>
  <name>hadoop.security.credential.provider.path</name>
  <value>localjceks://file/opt/mr3-run/ats/key/hivemr3-ssl-certificate.jceks</value>
</property>
Alternatively the user may set the password explicitly by updating kubernetes/ats-conf/ssl-server.xml (using the password generated by the script kubernetes/generate-hivemr3-ssl.sh).
$ vi kubernetes/ats-conf/ssl-server.xml

<property>
  <name>ssl.server.keystore.password</name>
  <value>4b41c3e6-7614-4d92-8a4b-d38b1a58831d</value>
</property>

<property>
  <name>ssl.server.keystore.keypassword</name>
  <value>4b41c3e6-7614-4d92-8a4b-d38b1a58831d</value>
</property>
In kubernetes/ats-conf/yarn-site.xml, allow only HTTPS and set the configuration key yarn.timeline-service.webapp.https.address to use the HTTPS port specified in kubernetes/yaml/ats-service.yaml.
Do not expand ${yarn.timeline-service.hostname}!
$ vi kubernetes/ats-conf/yarn-site.xml

<property>
  <name>yarn.http.policy</name>
  <value>HTTPS_ONLY</value>
</property>

<property>
  <name>yarn.timeline-service.webapp.https.address</name>
  <value>${yarn.timeline-service.hostname}:8190</value>
</property>
In order to use Timeline Server with SSL, the user should reconfigure MR3-UI and MR3 DAGAppMaster.
Timeline Server with SSL – 1. Configuring MR3-UI
The user should update config/configs.env in the MR3-UI directory to specify the HTTPS address of the Timeline Server:
hosts: {
  timeline: "https://indigo20:8190",
}
Timeline Server with SSL – 2. Configuring MR3 DAGAppMaster
In kubernetes/conf/yarn-site.xml, allow only HTTPS and set the configuration key yarn.timeline-service.hostname to the host name for the Timeline Server Service.
$ vi kubernetes/conf/yarn-site.xml

<property>
  <name>yarn.http.policy</name>
  <value>HTTPS_ONLY</value>
</property>

<property>
  <name>yarn.timeline-service.hostname</name>
  <value>indigo20</value>
</property>
In kubernetes/conf/mr3-site.xml, add the address of the Timeline Server Service to the configuration key mr3.k8s.host.aliases.
$ vi kubernetes/conf/mr3-site.xml

<property>
  <name>mr3.k8s.host.aliases</name>
  <value>indigo20=10.1.91.41</value>
</property>
The user should also check that the configuration key mr3.am.launch.cmd-opts includes -Djavax.net.ssl.trustStore=/opt/mr3-run/key/hivemr3-ssl-certificate.jks and -Djavax.net.ssl.trustStoreType=jks in its value.
In kubernetes/yaml/hive.yaml, spec/hostAliases field should include the host running Timeline Server.
$ vi kubernetes/yaml/hive.yaml

spec:
  template:
    spec:
      hostAliases:
      - ip: "10.1.91.41"
        hostnames:
        - "indigo20"
Metastore with SSL

In kubernetes/conf/core-site.xml, the KeyStore file holding private keys should be specified.
$ vi kubernetes/conf/core-site.xml

<property>
  <name>hadoop.security.credential.provider.path</name>
  <value>localjceks://file/opt/mr3-run/key/hivemr3-ssl-certificate.jceks</value>
</property>
The user should make a copy of the certificate file for connecting to the MySQL database for Metastore
and set MR3_METASTORE_MYSQL_CERTIFICATE in kubernetes/config-run.sh to point to the copy.
MR3_METASTORE_MYSQL_CERTIFICATE=/home/hive/mr3-run/kubernetes/mr3-metastore-mysql.cert

Similarly to Ranger, the user should extend the certificate file for MySQL so that MySQL can trust the self-signed certificate of Metastore.
Append the contents of mr3-ssl.pem created in the previous step to the certificate file for MySQL.
This step is unnecessary if Ranger and Metastore share the same MySQL database.
In kubernetes/conf/hive-site.xml, the user specifies the URL for connecting to the MySQL database (by appending ;useSSL=true&verifyServerCertificate=true) and enables SSL.
The KeyStore file with the self-signed certificate is already specified.
$ vi kubernetes/conf/hive-site.xml
<property>
<name>javax.jdo.option.ConnectionURL</name>
<value>jdbc:mysql://${hive.database.host}/${hive.database.name}?createDatabaseIfNotExist=true&useSSL=true&verifyServerCertificate=true</value>
</property>
<property>
<name>hive.metastore.use.SSL</name>
<value>true</value>
</property>
<property>
<name>hive.metastore.keystore.path</name>
<value>/opt/mr3-run/key/hivemr3-ssl-certificate.jks</value>
</property>
<property>
<name>hive.metastore.truststore.path</name>
<value>/opt/mr3-run/key/hivemr3-ssl-certificate.jks</value>
</property>
Since we are building a Kubernetes cluster in which only Beeline (and JDBC clients) can make connections to HiveServer2 and no ordinary users can directly access the data source,
it is okay to disable security on the Metastore side and rely only on Ranger for HiveServer2.
The user can disable security on the Metastore side by unsetting the two configuration keys hive.metastore.pre.event.listeners and metastore.pre.event.listeners in kubernetes/conf/hive-site.xml.
$ vi kubernetes/conf/hive-site.xml

<property>
  <name>hive.metastore.pre.event.listeners</name>
  <value></value>
</property>

<property>
  <name>metastore.pre.event.listeners</name>
  <value></value>
</property>
Then the configuration key hive.security.metastore.authorization.manager is automatically ignored.
Note that Thrift Metastore URI specified by hive.metastore.uris in kubernetes/conf/hive-site.xml is not exposed to the outside of the Kubernetes cluster
because HIVE_METASTORE_HOST in kubernetes/env.sh uses the host name for the Metastore Pod.
If Thrift Metastore URI should be exposed to the outside for some reason (after introducing a Kubernetes Service),
we should enable security on the Metastore side as well.
Once we incorporate HIVE-21753, the same Ranger instance can be used as an authorization manager for Metastore.
The user can hide the password for connecting to MySQL by updating kubernetes/mr3-ssl.jceks.
Here is an example of updating kubernetes/mr3-ssl.jceks when the password is passwd.
$ export JAVA_HOME=/usr/lib/jvm/java-1.8.0-openjdk-1.8.0.181-3.b13.el7_5.x86_64/jre/
$ hadoop/hadoop-2.7.7/bin/hadoop credential create javax.jdo.option.ConnectionPassword -provider jceks://file//home/gla/mr3-run/kubernetes/mr3-ssl.jceks -value passwd
javax.jdo.option.ConnectionPassword has been successfully created.
org.apache.hadoop.security.alias.JavaKeyStoreProvider has been updated.
$ keytool -list -storetype jceks -storepass none -keystore kubernetes/mr3-ssl.jceks
Keystore type: JCEKS
Keystore provider: SunJCE

Your keystore contains 13 entries

ssl.server.keystore.password, Jul 24, 2019, SecretKeyEntry,
...
javax.jdo.option.connectionpassword, Jul 30, 2019, SecretKeyEntry,
...
Now the configuration key javax.jdo.option.ConnectionPassword in kubernetes/conf/hive-site.xml can be set to _.
$ vi kubernetes/conf/hive-site.xml

<property>
  <name>javax.jdo.option.ConnectionPassword</name>
  <value>_</value>
</property>
HiveServer2 with SSL
In kubernetes/conf/core-site.xml, the KeyStore file holding private keys should be specified.
$ vi kubernetes/conf/core-site.xml

<property>
  <name>hadoop.security.credential.provider.path</name>
  <value>localjceks://file/opt/mr3-run/key/hivemr3-ssl-certificate.jceks</value>
</property>
In kubernetes/conf/hive-site.xml, the user enables SSL.
The KeyStore file with the self-signed certificate is already specified.
$ vi kubernetes/conf/hive-site.xml

<property>
  <name>hive.server2.use.SSL</name>
  <value>true</value>
</property>

<property>
  <name>hive.server2.keystore.path</name>
  <value>/opt/mr3-run/key/hivemr3-ssl-certificate.jks</value>
</property>

<property>
  <name>hive.server2.keystore.password</name>
  <value>_</value>
</property>
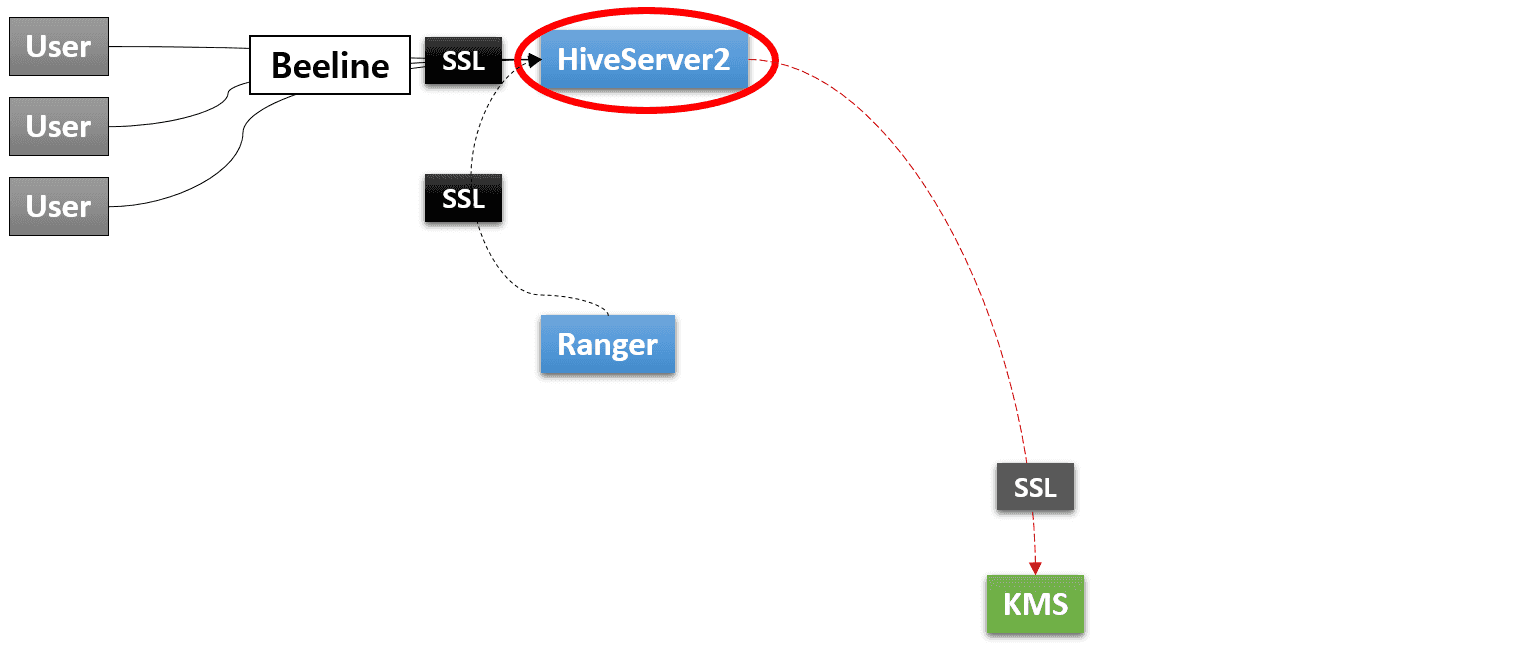
In order for HiveServer2 to communicate with KMS securely,
the user should make a copy of the certificate file for connecting to KMS
and set MR3_KMS_CERTIFICATE in kubernetes/config-run.sh to point to the copy.
MR3_KMS_CERTIFICATE=/home/gla/mr3-run/kubernetes/mr3-kms.cert
In kubernetes/yaml/hive.yaml, spec/hostAliases field should include the host running KMS.
$ vi kubernetes/yaml/hive.yaml

spec:
  template:
    spec:
      hostAliases:
      - ip: "10.1.91.4"
        hostnames:
        - "red0"
In kubernetes/conf/core-site.xml, the user specifies the address of KMS with SSL.
$ vi kubernetes/conf/core-site.xml

<property>
  <name>dfs.encryption.key.provider.uri</name>
  <value>kms://https@red0:9393/kms</value>
</property>
Running Ranger, Timeline Server, Metastore, HiveServer2
Running Ranger
kubernetes/run-ranger.sh collects the existing certificate files and the password from kubernetes/config-run.sh
in order to create three new files in the directory kubernetes/ranger-key:
- hivemr3-ssl-certificate.jks
- hivemr3-ssl-certificate.jceks
- .hivemr3-ssl-certificate.jceks.crc
These files are automatically mounted in the directory /opt/mr3-run/ranger/key/ inside the Ranger Pod.
In this way, Ranger can communicate with HiveServer2 and the MySQL database securely and also run its own HTTPS server.
The user can execute the script kubernetes/run-ranger.sh to start Ranger:
$ kubernetes/run-ranger.sh

Creating Hive MR3 SSL certificates...

Importing /home/gla/mr3-run/kubernetes/mr3-ranger-mysql.cert...
Certificate was added to keystore

...
deployment/hivemr3-ranger created
service/ranger created
After starting Ranger, connect to the Ranger webpage and
update the JDBC URL (e.g., jdbc:hive2://indigo20:9852/;principal=hive/indigo20@RED;ssl=true;sslTrustStore=/opt/mr3-run/ranger/key/hivemr3-ssl-certificate.jks;).
Running Timeline Server
The user can execute the script kubernetes/run-ats.sh to start Timeline Server.
Similarly to running Ranger,
the script collects the existing certificate files and the password from kubernetes/config-run.sh
in order to create three new files in the directory kubernetes/ats-key:
- hivemr3-ssl-certificate.jks
- hivemr3-ssl-certificate.jceks
- .hivemr3-ssl-certificate.jceks.crc
These files are automatically mounted in the directory /opt/mr3-run/ats/key/ insider the Timeline Server Pod.
$ kubernetes/run-ats.sh

Creating Hive MR3 SSL certificates...

Importing /home/gla/mr3-run/kubernetes/mr3-ranger-mysql.cert...
Certificate was added to keystore

...
ATS_SECRET_KEY=48258d9c-a615-4e62-8c00-0f6ff66c73b5
configmap/client-ats-config created
secret/hivemr3-ats-secret created
pod/hivemr3-ats created
service/timelineserver created
The value associated with ATS_SECRET_KEY is used when running HiveServer2.
Running Metastore and HiveServer2
The user can execute the script kubernetes/run-metastore.sh to start Metastore.
Similarly to running Ranger and Timeline Server, it collects the existing certificate files and the password from kubernetes/config-run.sh,
and mounts new KeyStore files in the directory /opt/mr3-run/hive/key/ inside the Pod.
For running HiveServer2,
the user should first set an environment variable ATS_SECRET_KEY to the value generated by the script kubernetes/run-ats.sh
so as to pass the secret key issued by Timeline Server to MR3 DAGAppMaster.
$ export ATS_SECRET_KEY=48258d9c-a615-4e62-8c00-0f6ff66c73b5
Now the user can execute the script kubernetes/run-hive.sh to start HiveServer2 which in turn starts MR3 DAGAppMaster.
Kubernetes tries to place all the Pods on the same node according to the Pod affinity rules, as shown in the following example:
$ kubectl get pod -n hivemr3 -o=custom-columns=NAME:.metadata.name,NODE:.spec.nodeName
NAME                        NODE
hivemr3-ats                 indigo21
hivemr3-hiveserver2-gzps4   indigo21
hivemr3-metastore-0         indigo21
hivemr3-ranger              indigo21
mr3master-3501-0            indigo21
The goal is to minimize the chance of these Pods mixing with ContainerWorker Pods on the same node so that the user can terminate those nodes running ContainerWorker Pods at any time without worrying about the operation of the Kubernetes cluster.
Running Beeline
Since HiveServer2 runs with SSL enabled, Beeline should use its own KeyStore file that contains the self-signed certificate.
The administrator user can create a new public KeyStore file beeline-ssl.jks for Beeline using the file mr3-ssl.pem created previously.
In the following example, we use beelinepasswd1 for the password for the public KeyStore file.
$ pwd
/home/gla/mr3-run/kubernetes
$ keytool -genkeypair -alias beeline-ssl-key -keyalg RSA -dname "CN=beeline-ssl" -keypass beelinepasswd1 -validity 999 -keystore beeline-ssl.jks -storepass beelinepasswd1
$ keytool -importcert -alias trusted-cert-hivemr3 -file mr3-ssl.pem -noprompt -keystore beeline-ssl.jks -storepass beelinepasswd1
Then the administrator user distributes the public KeyStore file beeline-ssl.jks to ordinary users.
On the outside of the Kubernetes cluster, an ordinary user can connect to HiveServer2 by executing the script kubernetes/hive/hive/run-beeline.sh with beeline-ssl.jks as the TrustStore file.
$ kubernetes/hive/hive/run-beeline.sh --ssl /home/gitlab-runner/mr3-run/kubernetes/beeline-ssl.jks
...
Connecting to jdbc:hive2://10.1.91.41:9852/;principal=hive/indigo20@RED;;ssl=true;sslTrustStore=/home/gitlab-runner/mr3-run/kubernetes/beeline-ssl.jks
Connected to: Apache Hive (version 3.1.3)
Driver: Hive JDBC (version 3.1.3)
Transaction isolation: TRANSACTION_REPEATABLE_READ
Beeline version 3.1.3 by Apache Hive
0: jdbc:hive2://10.1.91.41:9852/>
In the case of using Beeline to connect to HiveServer2, specifying the password beelinepasswd1 is unnecessary.
Refreshing the certificate in HiveServer2
In order to invalidate an old certificate and to use a new certificate, the administrator user should restart HiveServer2. A new public KeyStore file should also be distributed to ordinary users.
The validity of the certificate does not affect the connection to HiveServer2. Hence the administrator user does not have to refresh the certificate even after its expiry.
