MR3-UI is a module for visualizing the progress of DAGs. It is based on TEZ-UI included in the Tez distribution, so the usage is similar.
Before running MR3-UI
MR3-UI runs on the client side, but requires a Timeline Server in order to retrieve data on DAGs (both currently active and previously finished).
Hence the user should update yarn-site.xml properly before submitting DAGs.
For example, if a Timeline Server is running on red0, the user can add the following properties to yarn-site.xml:
<configuration>
  <property>
    <name>yarn.timeline-service.enabled</name>
    <value>true</value>
  </property>
  <property>
    <name>yarn.timeline-service.hostname</name>
    <value>red0</value>
  </property>
  <property>
    <name>yarn.resourcemanager.system-metrics-publisher.enabled</name>
    <value>true</value>
  </property>
  <property>
    <name>yarn.timeline-service.generic-application-history.enabled</name>
    <value>true</value>
  </property>
  <property>
    <name>yarn.timeline-service.http-cross-origin.enabled</name>
    <value>true</value>
  </property>
</configuration>
In a secure cluster with Kerberos, the user should specify the principal and service keytab file for the Timeline Server itself and also for Timeline HTTP authentication.
The following example shows which configuration keys should be set in yarn-site.xml.
<configuration>
  <property>
    <name>yarn.timeline-service.principal</name>
    <value>yarn/_HOST@datamonad.com</value>
  </property>
  <property>
    <name>yarn.timeline-service.keytab</name>
    <value>/etc/security/keytabs/yarn.service.keytab</value>
  </property>
  <property>
    <name>yarn.timeline-service.http-authentication.type</name>
    <value>kerberos</value>
  </property>
  <property>
    <name>yarn.timeline-service.http-authentication.kerberos.principal</name>
    <value>HTTP/_HOST@datamonad.com</value>
  </property>
  <property>
    <name>yarn.timeline-service.http-authentication.kerberos.keytab</name>
    <value>/etc/security/keytabs/spnego.service.keytab</value>
  </property>
</configuration>
If you update yarn-site.xml, restart both the Yarn Resource Manager and the Timeline Server.
Running Timeline Server in a Docker container
If the Timeline Server running on Hadoop is not compatible with MR3, the use can create a Docker container to run another Timeline Server compatible with MR3. For creating a Docker image, see Building a Docker image for Timeline Server. Below we demonstrate how to run a Timeline Server using a pre-built Docker image from DockerHub (mr3project/ats-2.7.7) in the context of executing Hive on MR3 on Hadoop.
Choose a secret key for connecting to Timeline Server
and set the environment variable ATS_SECRET_KEY.
$ export ATS_SECRET_KEY=HelloWorld
Open kubernetes/run-ats-docker.sh and set the following variables:
$ vi kubernetes/run-ats-docker.sh

DOCKER_ATS_IMG=mr3project/ats-2.7.7:latest
TIMELINE_WORK_DIR=/home/hive/timeline-docker

LOCAL_HOST=192.168.10.101
LOCAL_PORT_HTTP=8189
LOCAL_PORT_HTTPS=8191
DOCKER_ATS_IMGis set to the Docker image for Timeline Server.TIMELINE_WORK_DIRpoints to the local directory where Timeline Server stores its internal data. The directory should be writable to user with the user with UID 1000.LOCAL_HOSTis set to the IP address of the local host where a Docker container is created.LOCAL_PORT_HTTPis set to the port for connecting to Timeline Server. If the default port 8188 for Timeline Server is already in use (e.g., by the Timeline Server already running on Hadoop), the user should choose a different port that is not taken.LOCAL_PORT_HTTPSis set to the HTTPS port for connecting to Timeline Server when SSL is enabled.
Open mr3-site.xml and set the configuration key mr3.am.launch.env
to include ATS_SECRET_KEY, e.g.:
$ vi conf/tpcds/mr3/mr3-site.xml

<property>
  <name>mr3.am.launch.env</name>
  <value>ATS_SECRET_KEY</value>
</property>
Then MR3 DAGAppMaster inherits the environment variable ATS_SECRET_KEY from HiveServer2
and can connect to Timeline Server (which shares the same secret key).
For running MR3 DAGAppMaster in LocalProcess mode, this step is unnecessary.
Finally the user can execute kubernetes/run-ats-docker.sh
to start Timeline Server in a Docker container.
$ kubernetes/run-ats-docker.sh
ATS_SECRET_KEY=HelloWorld
2023-09-06 14:16:31,940 [main] INFO  org.apache.hadoop.util.LogAdapter (LogAdapter.java:45) - STARTUP_MSG:
...
Before executing HiveServer2, the user should
open hive-site.xml and set the configuration key yarn.timeline-service.webapp.address
to override the default value from Hadoop, e.g.:
$ vi conf/tpcds/hive3/hive-site.xml

<property>
  <name>yarn.timeline-service.webapp.address</name>
  <value>192.168.10.101:8189</value>
</property>
The address should match LOCAL_HOST and LOCAL_PORT_HTTP
specified in the previous step.
When starting HiveServer2, make sure that
the environment variable ATS_SECRET_KEY is properly set.
Or update env.sh:
$ vi env.sh

export ATS_SECRET_KEY=HelloWorld
Installing and configuring MR3-UI
Download mr3-ui-1.0.tar.gz (or a later version) and extract it to a MR3-UI directory that can be accessed by a web server.
Since MR3-UI is a JavaScript application running on the client side, the user may install it on any machine where a web server is ready.
For example, it is okay to install MR3-UI on the local machine.
Then update config/configs.env in the MR3-UI directory to specify the addresses of the Timeline Server, as illustrated in the following example:
hosts: {
  /*
  * Timeline Server Address:
  * By default MR3 UI looks for timeline server at http://localhost:8188, uncomment
  * and change the following value for pointing to a different address.
  */
  timeline: "red0:8188",
}
By default, a DAGAppMaster does not communicate with the Timeline Server and thus MR3-UI displays nothing.
In order to activate MR3-UI, the following keys should be set in mr3-site.xml.
mr3.app.history.logging.enabledshould be set to true in order to display states of Applications and ContainerWorkers in MR3-UI.mr3.dag.history.logging.enabledshould be set to true in order to display states of DAGs and Vertexes in MR3-UI.mr3.task.history.logging.enabledshould be set to true in order to display states of Tasks and TaskAttempts in MR3-UI.
Using MR3-UI
The user can visit the MR3-UI address specified by its installation directory.
MR3-UI has three main tabs at the top: DAGs, Containers, and Applications.
-
The
DAGstab lists DAGs, both currently active and previously finished, in reverse chronological order.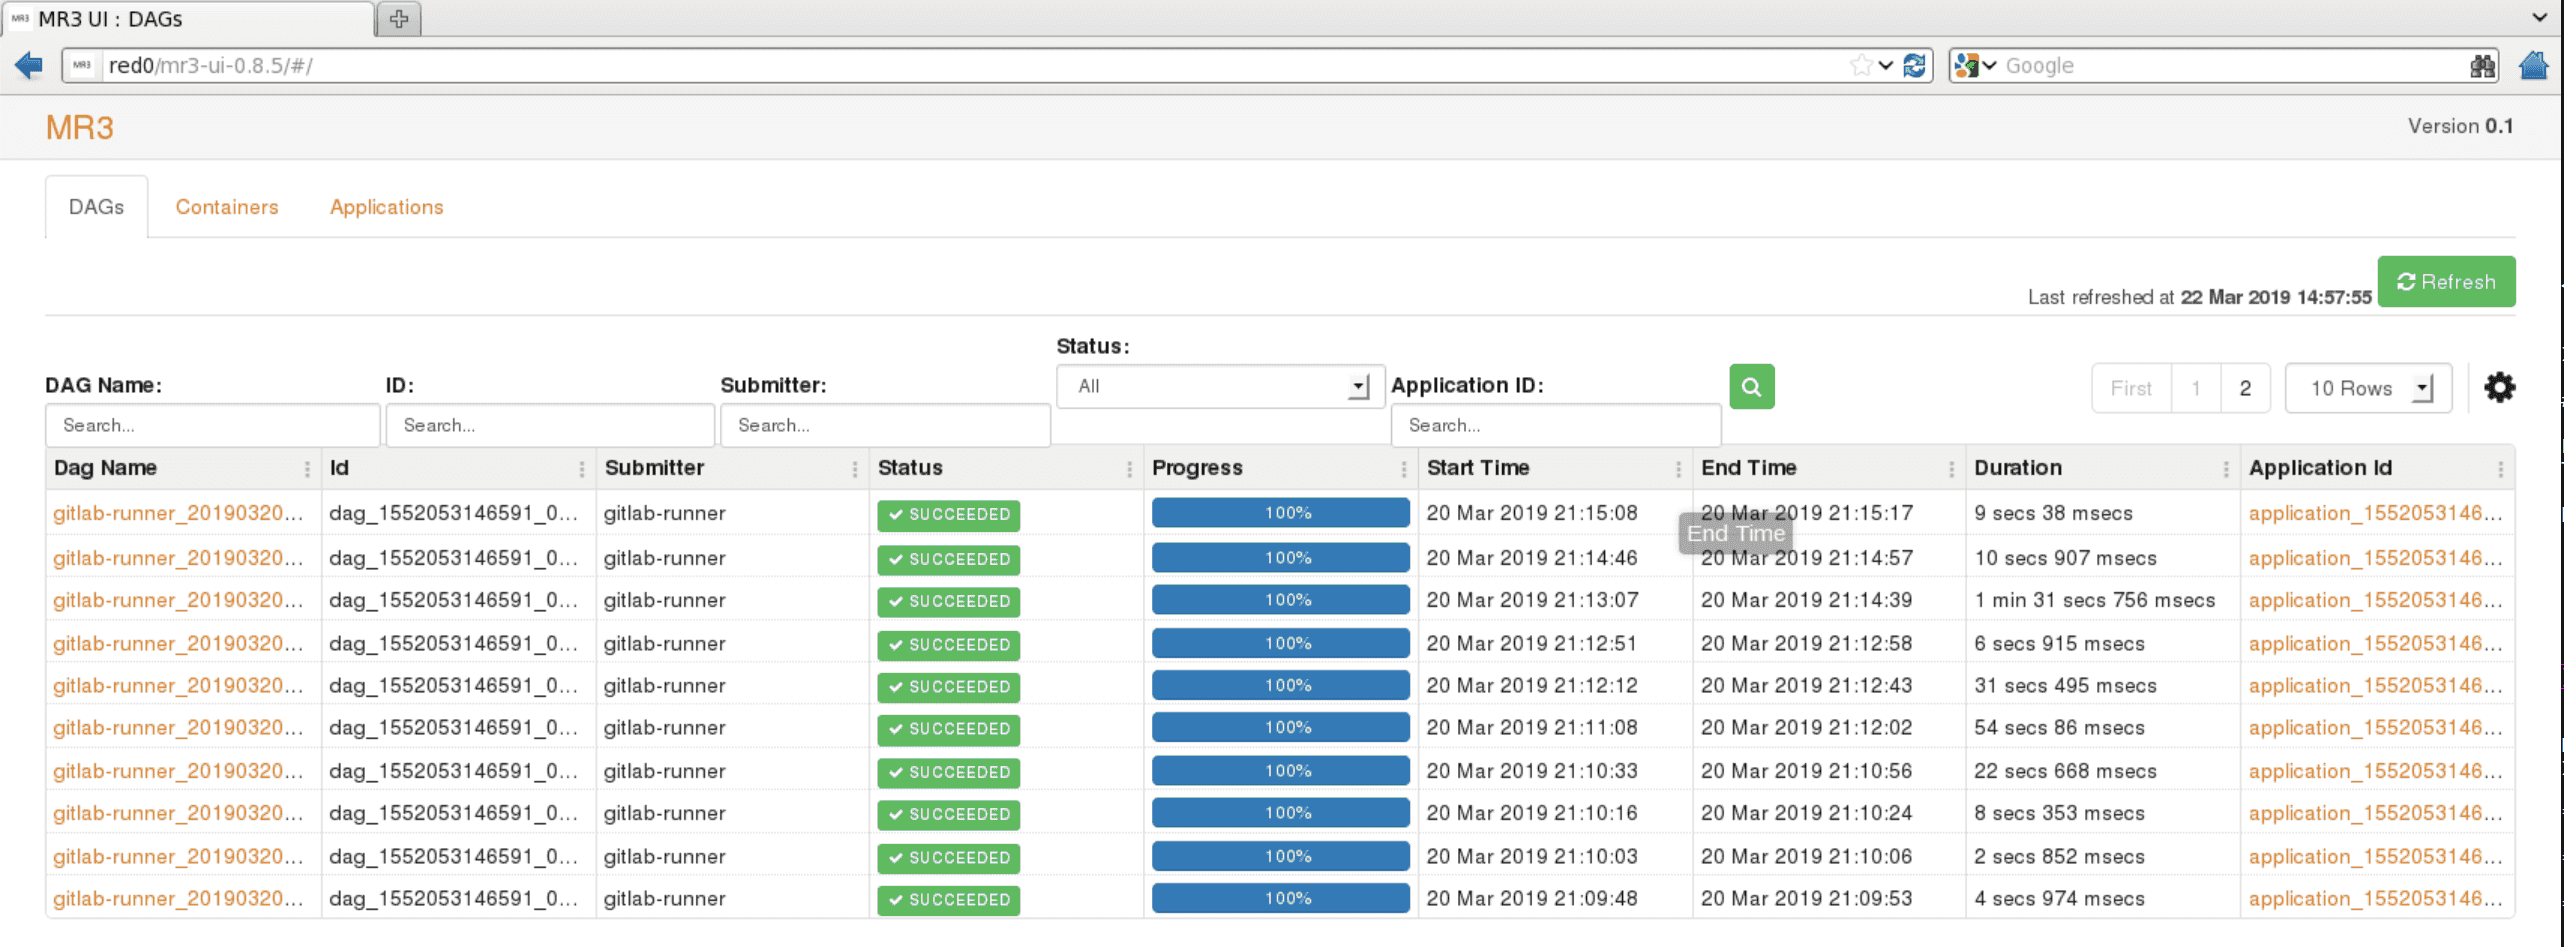
-
The
Containerstab lists MR3 ContainerWorkers.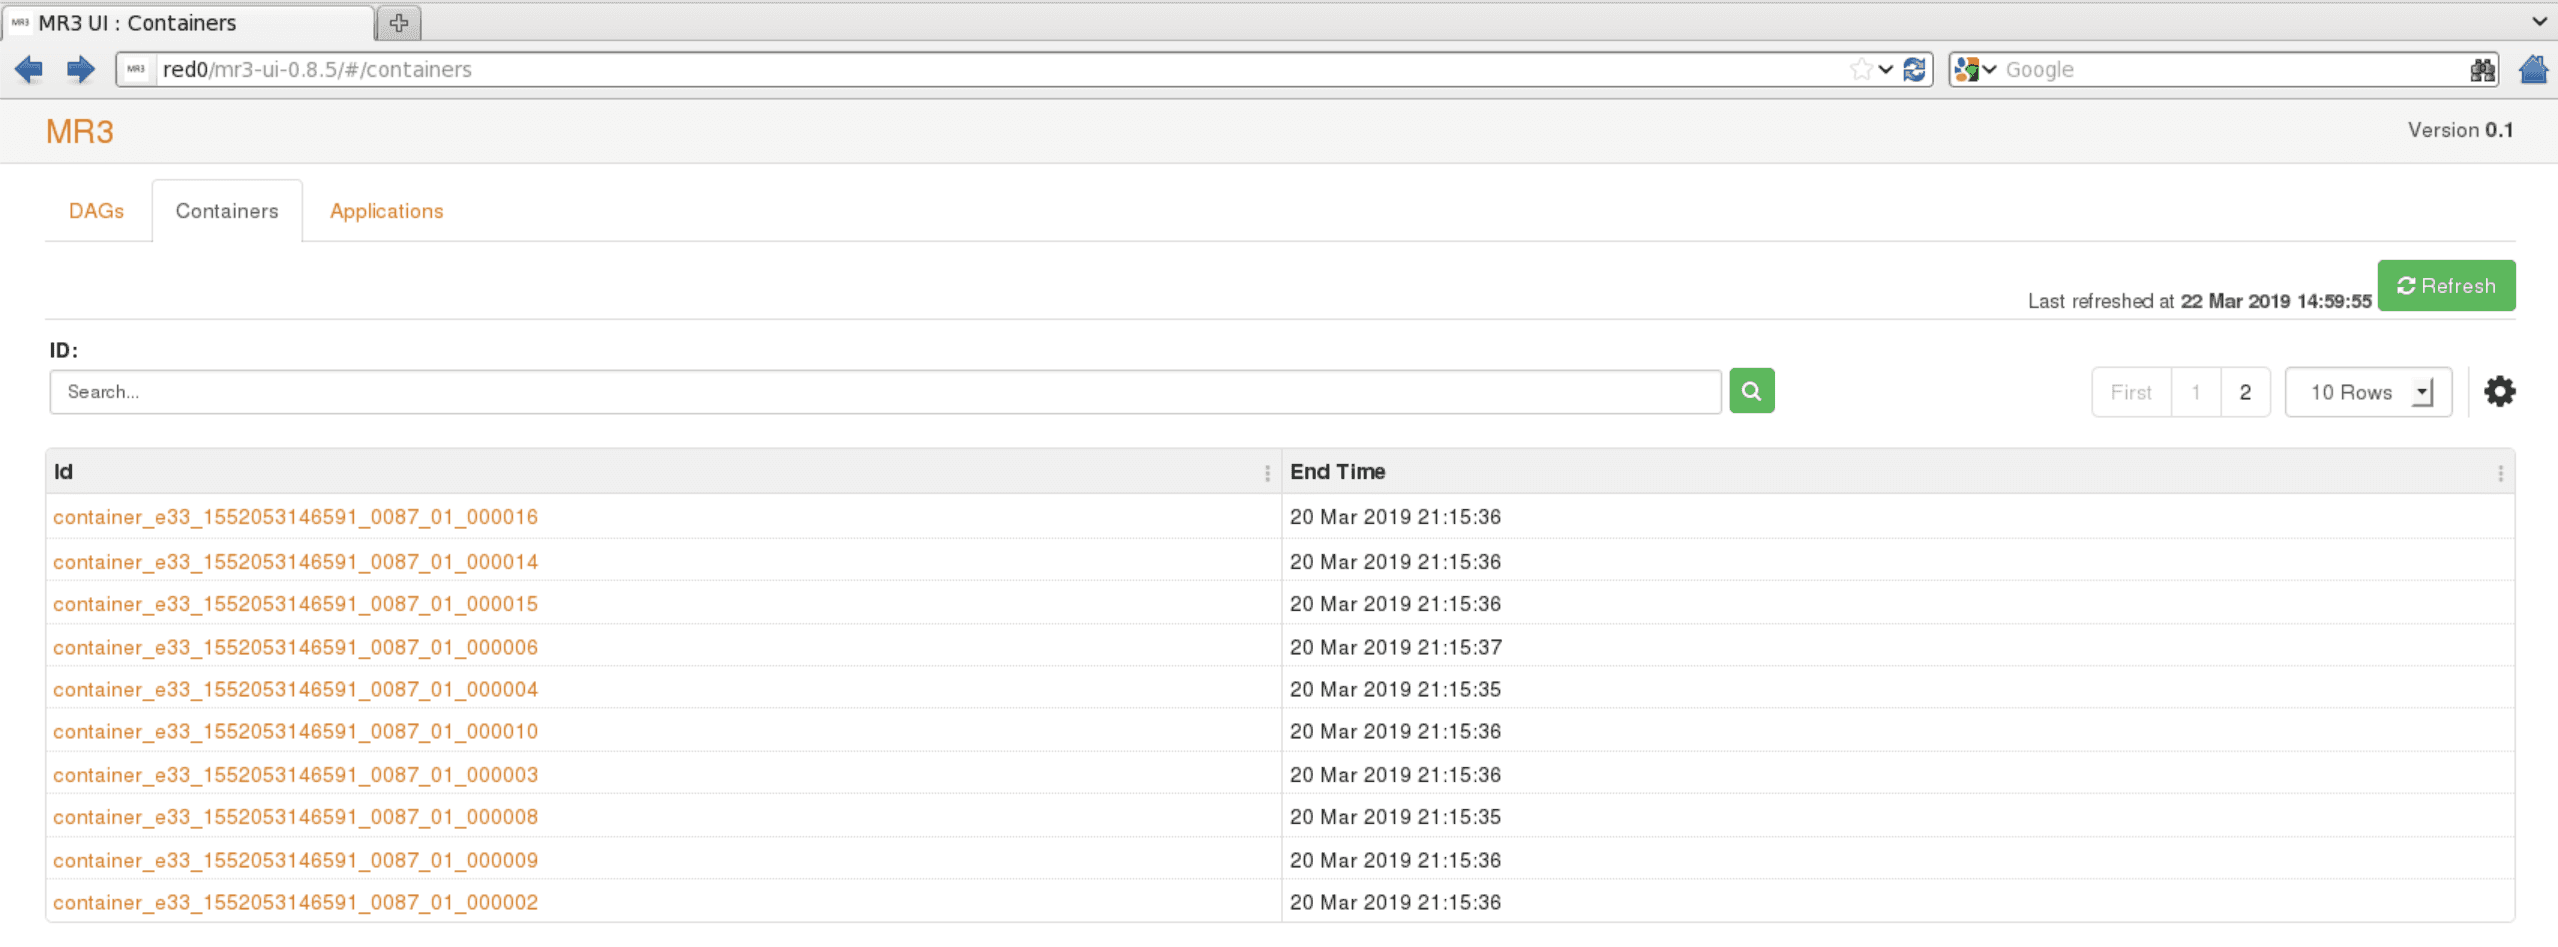
-
The
Applicationstab lists all MR3 DAGAppMasters (which are Applications from the viewpoint of Yarn).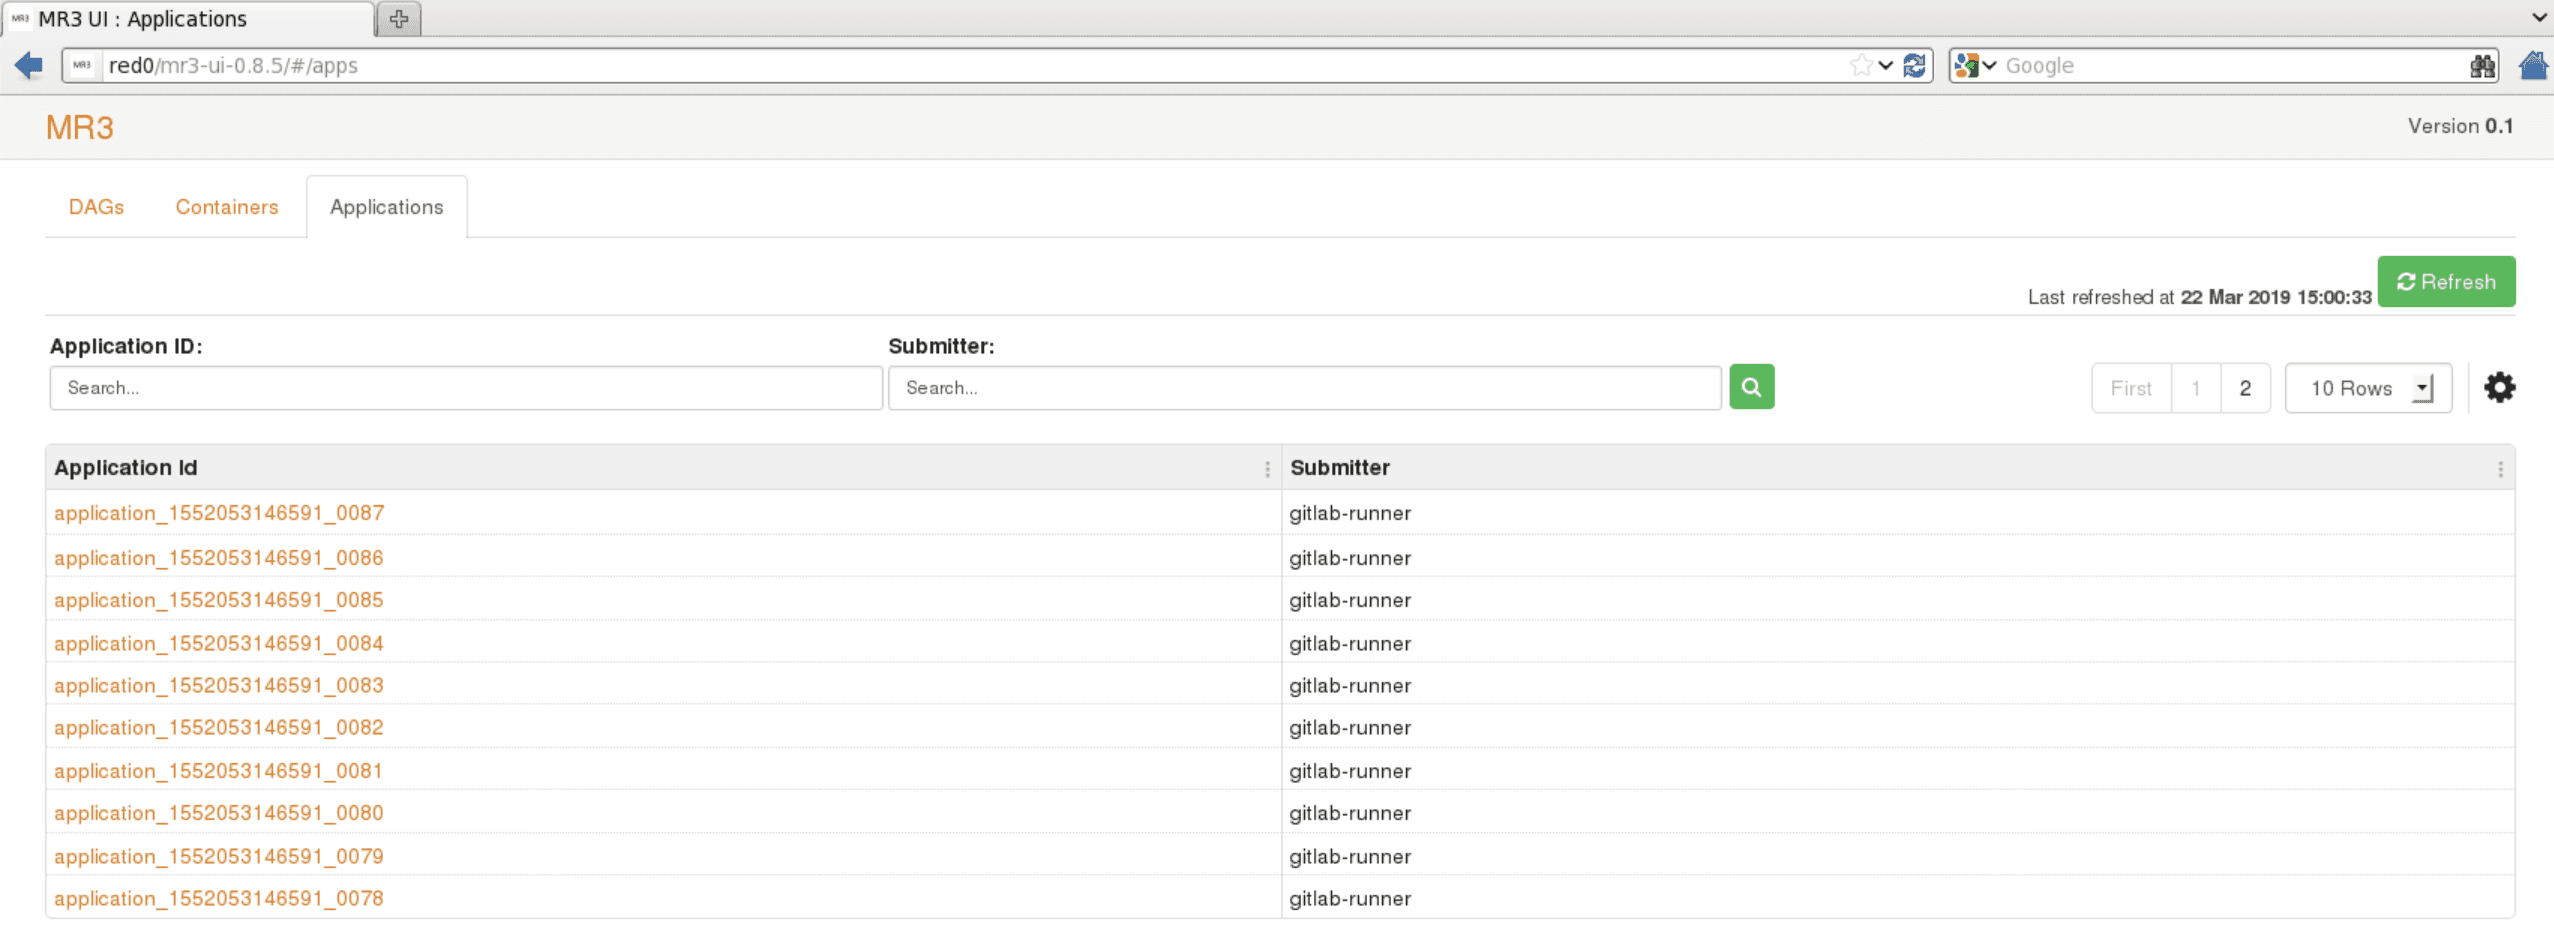 Under the
 DAGstab, the user can check the progress of individual DAGs. For example, theDAG Detailstab shows the details of a DAG: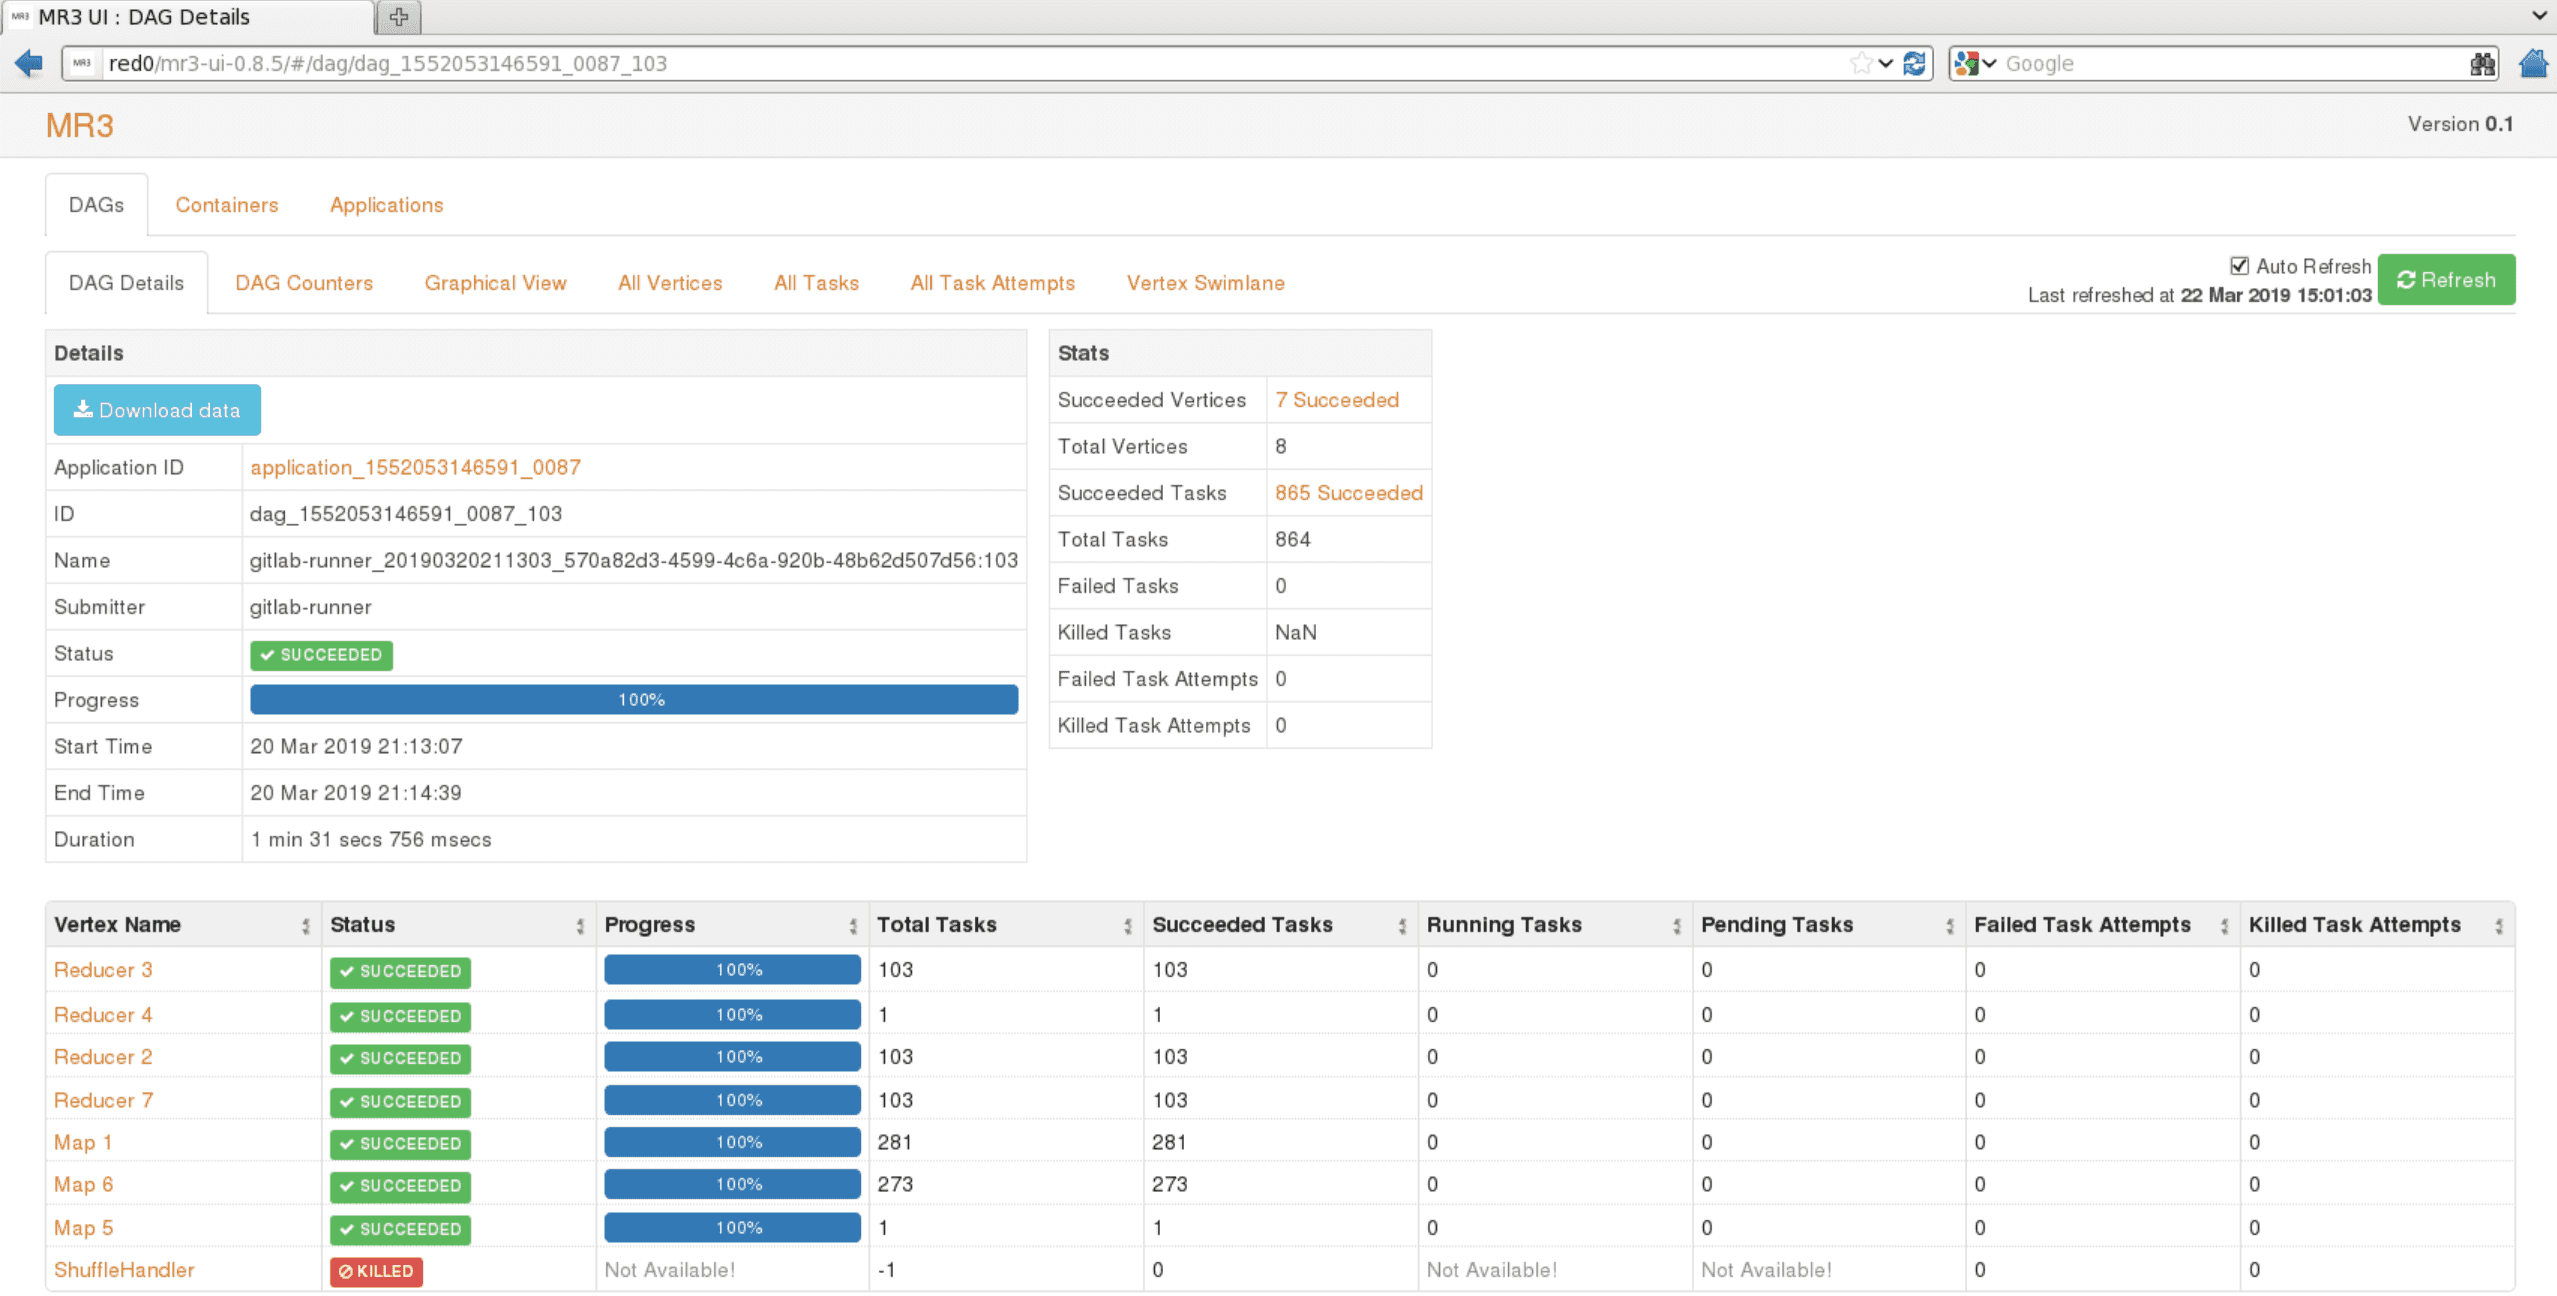
-
The
Graphical Viewtab shows a graphical view of a DAG: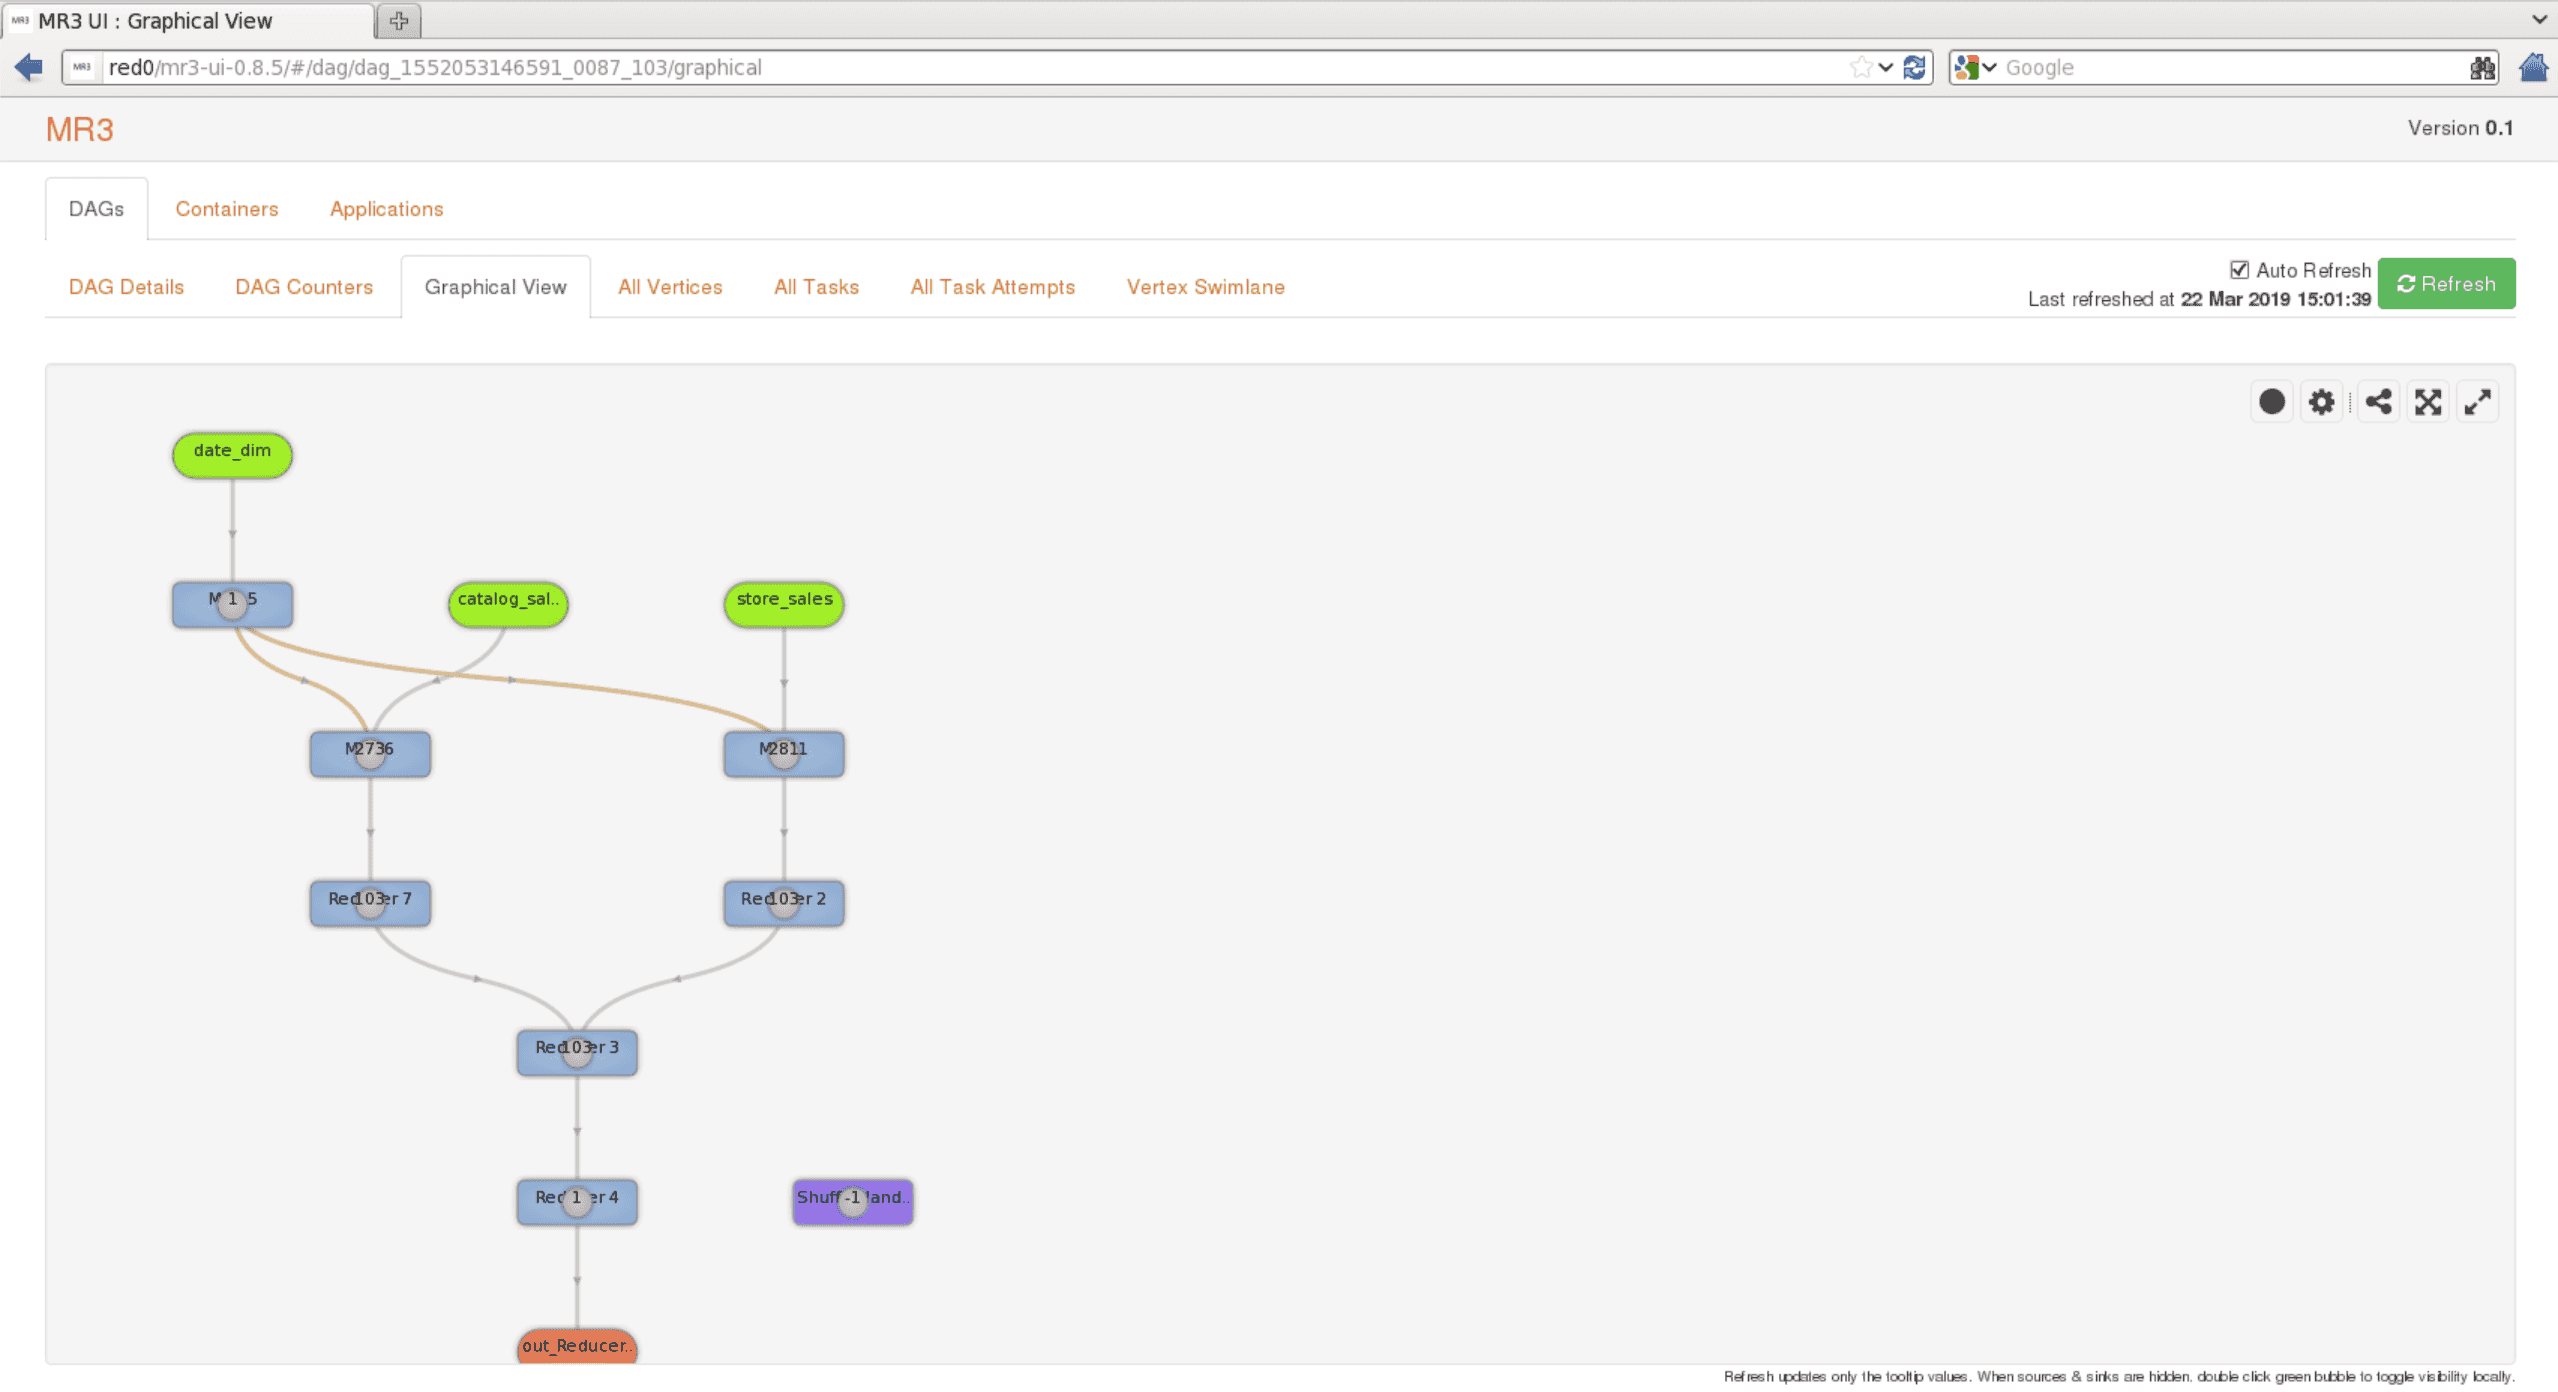
Some versions of Firefox may not display MR3-UI properly. In such a case, try to use Google Chrome.
Connecting to a Timeline Server running in a secure cluster with Kerberos
If a Timeline Server runs in a secure cluster with Kerberos and the user runs MR3-UI on a local machine that is not part of the cluster, MR3-UI can retrieve data on DAGs only if the following two requirements are met:
- The user can obtain a valid Kerberos ticket from the KDC server.
- The web browser is configured to establish a secure connection with the Timeline Server.
A failure to meet these requirements usually results in an error message shown below:

Obtaining a Kerberos ticket
In order to obtain a Kerberos ticket, the user should install a Kerberos client on the local machine and configure it.
For example, the user can set the configuration file /etc/krb5.conf on Linux or C:\ProgramData\MIT\Kerberos5\krb5.ini on Windows.
In the following example, we communicate with the KDC server at red0 through local port 5001:
[libdefaults]
  renew_lifetime = 7d
  forwardable = true
  default_realm = RED
  ticket_lifetime = 24h
  dns_lookup_realm = false
  dns_lookup_kdc = false
  default_ccache_name = /tmp/krb5cc_%{uid}

[logging]
  default = FILE:/var/log/krb5kdc.log
  admin_server = FILE:/var/log/kadmind.log
  kdc = FILE:/var/log/krb5kdc.log

[realms]
  RED = {
    admin_server = red0
    kdc = localhost:5001
  }
Next the user should establish a connection to the KDC server so as to obtain a Kerberos ticket.
In the following example, the user connects to the KDC server on red0:88 through local port 5001 via a remote server master1 (on which red0 is directly accessible):
$ ssh -L5001:red0:88 gla@master1
Then the user can obtain a valid Kerberos ticket, e.g., by executing kinit.
Configuring the web browser
With a valid Kerberos ticket, the user should configure the web browser so that it can establish a secure connection to the Timeline Server.
As an example, we use local port 5000 through which the web browser communicates with the Timeline Server running at red0 via a remote server master1 (on which red0 is directly accessible):
$ ssh -D5000 gla@master1
In Firefox, the user should enable manual proxy configuration with port 5000:
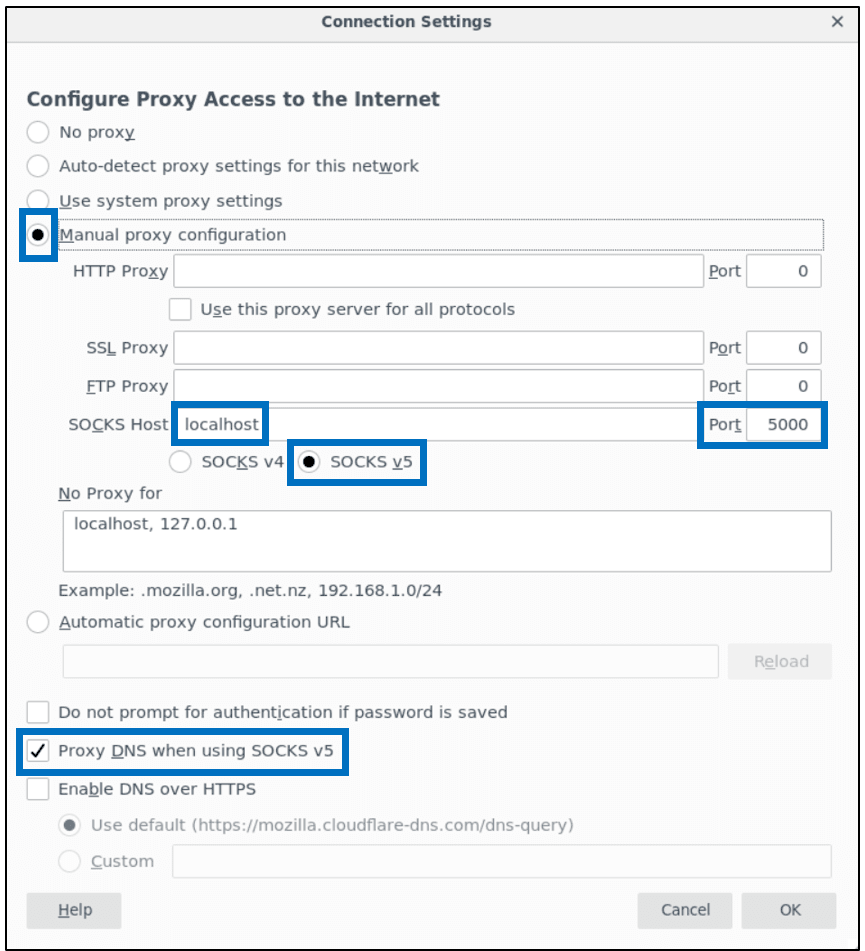
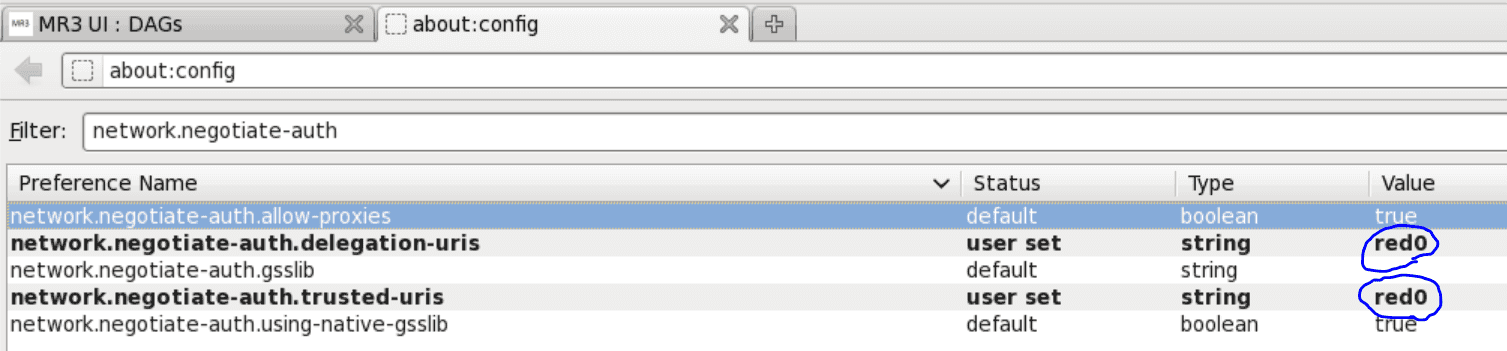
Then the following two configuration keys should be set to the host running the Timeline Server (in Firefox):
network.negotiate-auth.delegation-urisnetwork.negotiate-auth.trusted-uris
On Windows, another configuration key network.auth.use-sspi should be set to false.
Now MR3-UI should run okay.
