This page shows how to operate Hive on MR3 on Amazon EKS with autoscaling. By following the instruction, the user will learn:
- how to create and configure an EKS cluster for running Hive on MR3 with autoscaling
- how to run Hive on MR3 in the EKS cluster
This scenario has the following prerequisites:
- The user can create and update IAM policies.
- The user has access to an S3 bucket storing the warehouse and all S3 buckets containing datasets.
- The user can create an EKS cluster with the command
eksctl. - The user can configure LoadBalancers.
- The user either can create EFS or has access to an S3 bucket for storing transient data.
- A database server for Metastore is running and accessible from the EKS cluster.
- The user can run Beeline to connect to HiveServer2 running at a given address.
The user may create new resources (such as IAM policies) either on the AWS console or by executing AWS CLI.
Although this page is self-contained, we recommend the user to read the page on Autoscaling and the guide on running Hive on MR3 on Amazon EKS before proceeding. Since Amazon EKS is a particular case of Kubernetes, it also helps to try running Hive on MR3 on Minikube as explained in the page On Minikube.
We use a pre-built Docker image available at DockerHub, so the user does not have to build a new Docker image. In our example, we use a MySQL server for Metastore, but Postgres and MS SQL are also okay. This scenario should take 1 hour to 2 hours to complete, including the time for creating an EKS cluster.
For asking any questions, please visit MR3 Google Group or join MR3 Slack.
Installation
Download an MR3 release containing the executable scripts.
A pre-built Docker image is intended for evaluating Hive on MR3 with a limit on the aggregate capacity of MR3 workers. For running Hive on MR3 in production, contact us.
$ git clone https://github.com/mr3project/mr3-run-k8s.git
$ cd mr3-run-k8s/kubernetes/
$ git checkout release-1.11-hive3
$ git clone https://github.com/mr3project/mr3-run-k8s.git
$ cd mr3-run-k8s/kubernetes/
Basic settings
Set RUN_AWS_EKS to true in env.sh
because we create PersistentVolumeClaim from EFS.
$ vi env.sh

RUN_AWS_EKS=true
We use InstanceProfileCredentialsProvider for the credential provider
(and thus do not use AWS access key and secret key).
$ vi conf/core-site.xml

<property>
  <name>fs.s3a.aws.credentials.provider</name>
  <value>com.amazonaws.auth.InstanceProfileCredentialsProvider</value>
</property>
For authentication and authorization in HiveServer2, we use the following settings.
$ vi conf/hive-site.xml

<property>
  <name>hive.metastore.pre.event.listeners</name>
  <value></value>
</property>
<property>
  <name>metastore.pre.event.listeners</name>
  <value></value>
</property>

<property>
  <name>hive.security.authenticator.manager</name>
  <value>org.apache.hadoop.hive.ql.security.ProxyUserAuthenticator</value>
</property>

<property>
  <name>hive.security.authorization.manager</name>
  <value>org.apache.hadoop.hive.ql.security.authorization.plugin.sqlstd.SQLStdConfOnlyAuthorizerFactory</value>
</property>
We enable autoscaling in MR3 and do not check the ownership and directory permission of the staging directory.
$ vi conf/mr3-site.xml

<property>
  <name>mr3.enable.auto.scaling</name>
  <value>true</value>
</property>

<property>
  <name>mr3.am.staging.dir.check.ownership.permission</name>
  <value>false</value>
</property>
For ContainerWorkers,
we mount instance storage on the directory /ephemeral1.
$ vi conf/mr3-site.xml

<property>
  <name>mr3.k8s.pod.worker.hostpaths</name>
  <value>/ephemeral1</value>
</property>
Setting resources for Metastore, HiveServer2, and DAGAppMaster
We allocate resources to Metastore, HiveServer2, and DAGAppMaster Pods
so that all the Pods can fit in a single instance of type m5.xlarge for the master node.
$ vi env.sh

HIVE_SERVER2_HEAPSIZE=4096
HIVE_METASTORE_HEAPSIZE=4096
$ vi yaml/hive.yaml

        resources:
          requests:
            cpu: 1
            memory: 4Gi
          limits:
            cpu: 1
            memory: 4Gi
$ vi yaml/metastore.yaml

          requests:
            cpu: 1
            memory: 4Gi
          limits:
            cpu: 1
            memory: 4Gi
$ vi conf/mr3-site.xml

<property>
  <name>mr3.am.resource.memory.mb</name>
  <value>4096</value>
</property>

<property>
  <name>mr3.am.resource.cpu.cores</name>
  <value>1</value>
</property>
IAM policy for autoscaling
Create an IAM policy EKSAutoScalingWorkerPolicy.
Get the ARN (Amazon Resource Name) of the IAM policy.
$ vi EKSAutoScalingWorkerPolicy.json
{
  "Version": "2012-10-17",
  "Statement": [
    {
      "Effect": "Allow",
      "Action": [
        "autoscaling:DescribeAutoScalingGroups",
        "autoscaling:DescribeAutoScalingInstances",
        "autoscaling:DescribeLaunchConfigurations",
        "autoscaling:DescribeTags",
        "ec2:DescribeInstanceTypes",
        "ec2:DescribeLaunchTemplateVersions"
      ],
      "Resource": ["*"]
    },
    {
      "Effect": "Allow",
      "Action": [
        "autoscaling:SetDesiredCapacity",
        "autoscaling:TerminateInstanceInAutoScalingGroup",
        "ec2:DescribeInstanceTypes",
        "eks:DescribeNodegroup"
      ],
      "Resource": ["*"]
    }
  ]
}

$ aws iam create-policy --policy-name EKSAutoScalingWorkerPolicy --policy-document file://EKSAutoScalingWorkerPolicy.json
{
    "Policy": {
...
        "Arn": "arn:aws:iam::111111111111:policy/EKSAutoScalingWorkerPolicy",
...
IAM policy for accessing S3 buckets
Create an IAM policy for allowing every Pod to access S3 buckets storing the warehouse and containing datasets. If S3 (instead of EFS) is used to store transient data, extend the policy so that every Pod can access the S3 bucket for the scratch directory.
Adjust the Action field to restrict the set of operations permitted to Pods.
Get the ARN of the IAM policy.
In our example, we create an IAM policy called MR3AccessS3.
$ vi MR3AccessS3.json
{
    "Version": "2012-10-17",
    "Statement": [
        {
            "Effect": "Allow",
            "Action": [
                "s3:*"
            ],
            "Resource": [
                "arn:aws:s3:::hivemr3-warehouse-dir",
                "arn:aws:s3:::hivemr3-warehouse-dir/*",
                "arn:aws:s3:::hivemr3-partitioned-10-orc",
                "arn:aws:s3:::hivemr3-partitioned-10-orc/*"
            ]
        }
    ]
}

$ aws iam create-policy --policy-name MR3AccessS3 --policy-document file://MR3AccessS3.json
{
    "Policy": {
...
        "Arn": "arn:aws:iam::111111111111:policy/MR3AccessS3",
...
Configuring an EKS cluster
Open eks/cluster.yaml.
Set the region for an EKS cluster.
$ vi eks/cluster.yaml

metadata:
  region: ap-northeast-2
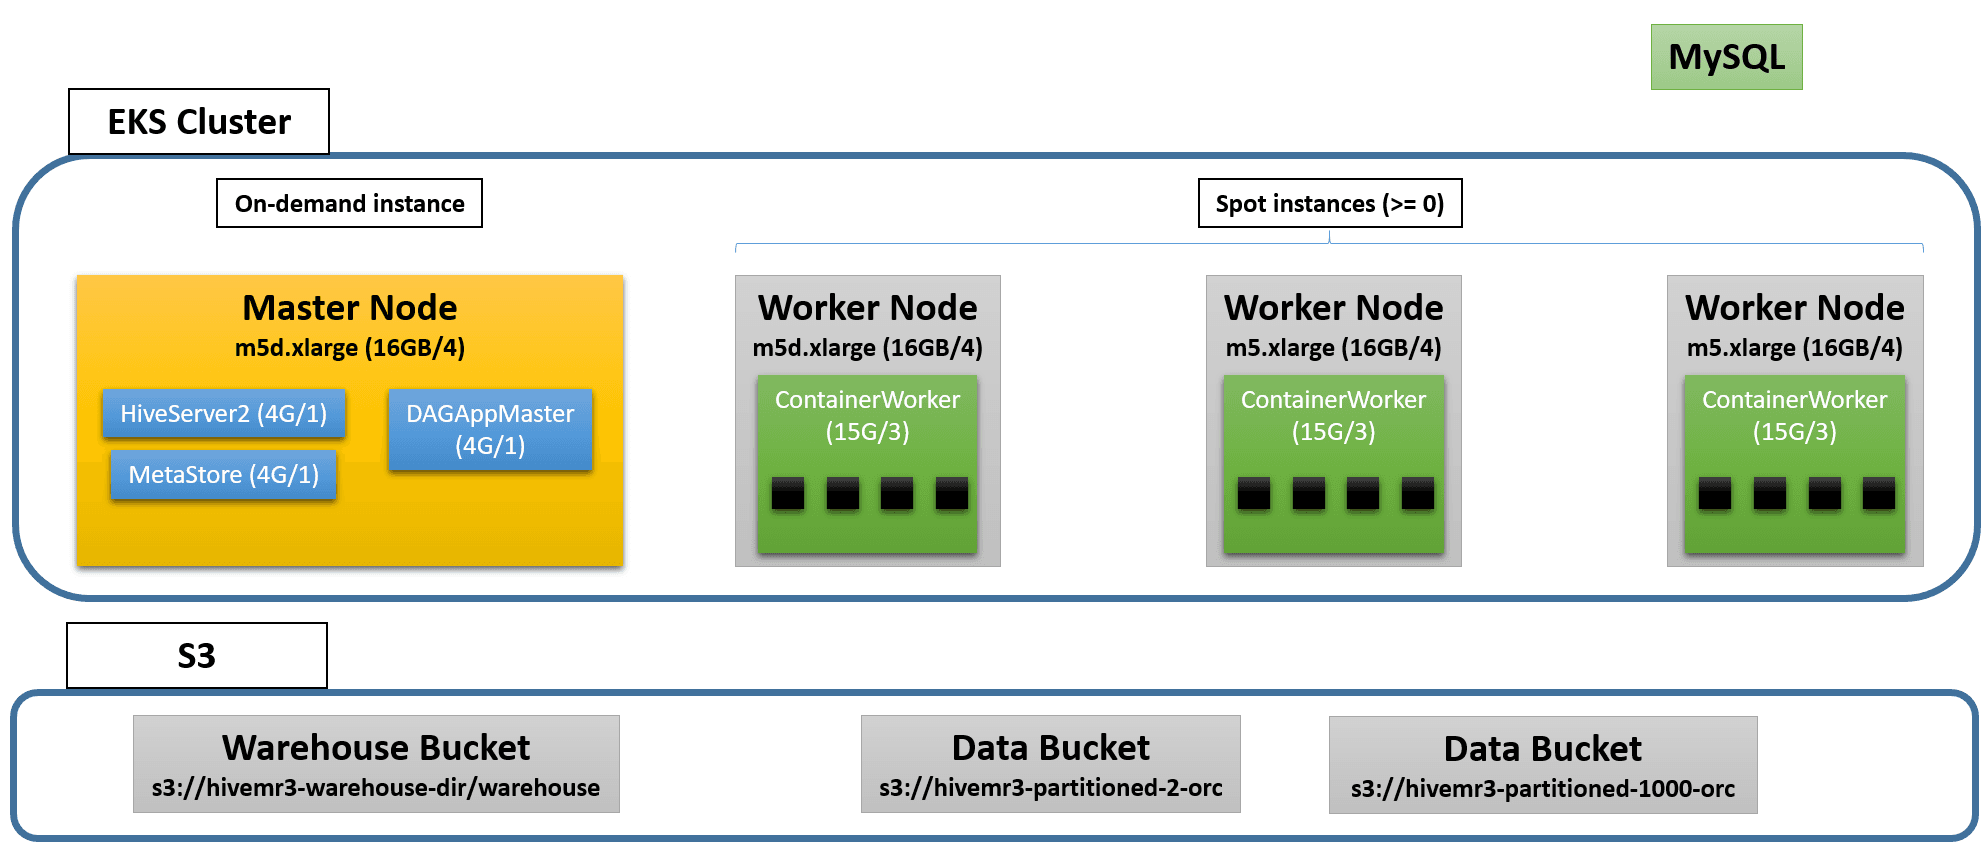
We create an EKS cluster with two node groups: mr3-master and mr3-worker.
- The
mr3-masternode group is intended for HiveServer2, DAGAppMaster, and Metastore Pods, and uses a single on-demand instance of typem5.xlargefor the master node. - The
mr3-workernode group is intended for ContainerWorker Pods, and uses up to three spot instances of typem5d.xlargefor worker nodes. Note that worker nodes have instance storage. Ifeksctlrequires at least two instance types for themr3-workernode group, upgrade it to the latest version.
nodeGroups:
  - name: mr3-master
    instanceType: m5.xlarge
    desiredCapacity: 1

  - name: mr3-worker
    desiredCapacity: 0
    minSize: 0
    maxSize: 3
    instancesDistribution:
      instanceTypes: ["m5d.xlarge"]
      onDemandBaseCapacity: 0
      onDemandPercentageAboveBaseCapacity: 0
In the iam/attachPolicyARNs field of both node groups mr3-master and mr3-worker,
use the ARNs of the IAM policies created in the previous steps.
(Without using the ARN for mr3-master, the user cannot check the status of the Kubernetes Autoscaler.)
nodeGroups:
  - name: mr3-master
    iam:
      attachPolicyARNs:
        - arn:aws:iam::aws:policy/AmazonEKSWorkerNodePolicy
        - arn:aws:iam::aws:policy/AmazonEKS_CNI_Policy
        - arn:aws:iam::111111111111:policy/EKSAutoScalingWorkerPolicy
        - arn:aws:iam::111111111111:policy/MR3AccessS3
  - name: mr3-worker
    iam:
      attachPolicyARNs:
        - arn:aws:iam::aws:policy/AmazonEKSWorkerNodePolicy
        - arn:aws:iam::aws:policy/AmazonEKS_CNI_Policy
        - arn:aws:iam::111111111111:policy/EKSAutoScalingWorkerPolicy
        - arn:aws:iam::111111111111:policy/MR3AccessS3
In the preBootstrapCommands field of the node group mr3-worker,
list commands for initializing instance storage.
In our example, we format /dev/nvme1n1 as ext4 and mount a single local disk on the directory /ephemeral1.
Note that the owner of /ephemeral1 is set to ec2-user
whose UID 1000 matches the UID of user hive in the Docker image.
nodeGroups:
  - name: mr3-worker
    preBootstrapCommands:
      - "mkfs -t ext4 /dev/nvme1n1"
      - "mkdir -p /ephemeral1"
      - "mount /dev/nvme1n1 /ephemeral1"
      - "chown ec2-user:ec2-user /ephemeral1"
By default, the command eksctl uses all Availability Zones (AZs) from the region specified by the field metadata/region.
The user should be aware that
Amazon charges for data transfer between different AZs ($0.01/GB to $0.02/GB)
and intermediate data exchanged by ContainerWorkers can cross the AZ boundary.
The user can use a single AZ by updating eks/cluster.yaml as follows:
$ vi eks/cluster.yaml

availabilityZones: ["ap-northeast-2a", "ap-northeast-2b", "ap-northeast-2c"]

nodeGroups:
  - name: mr3-master
    availabilityZones: ["ap-northeast-2a"]

  - name: mr3-worker
    availabilityZones: ["ap-northeast-2a"]
If eksctl does not accept this update, upgrade it to the latest version.
Creating an EKS cluster
Create an EKS cluster by executing the command eksctl.
The following diagram shows an example of the EKS cluster after launch:
Creating an EKS cluster can take 15 minutes or longer.
Get the name of the CloudFormation stack eksctl-hive-mr3-cluster.
$ eksctl create cluster -f eks/cluster.yaml
2022-08-19 15:59:20 [ℹ]  eksctl version 0.86.0
2022-08-19 15:59:20 [ℹ]  using region ap-northeast-2
...
2022-08-19 16:16:41 [✔]  EKS cluster "hive-mr3" in "ap-northeast-2" region is ready
Get the VPC ID of CloudFormation eksctl-hive-mr3-cluster.
$ aws ec2 describe-vpcs --filter Name=tag:aws:cloudformation:stack-name,Values=eksctl-hive-mr3-cluster --query "Vpcs[*].[VpcId]"
[
    [
        "vpc-071d0a8172da4ff6a"
    ]
]

$ VPCID=vpc-071d0a8172da4ff6a
Get the public subnet ID of CloudFormation eksctl-hive-mr3-cluster.
$ aws ec2 describe-subnets --filter Name=vpc-id,Values=$VPCID Name=availability-zone,Values=ap-northeast-2a Name=tag:aws:cloudformation:stack-name,Values=eksctl-hive-mr3-cluster Name=tag:Name,Values="*Public*" --query "Subnets[*].[SubnetId]"
[
    [
        "subnet-02d8b2ea3f0d7b483"
    ]
]

$ SUBNETID=subnet-02d8b2ea3f0d7b483
The user can find that serveral security groups are created.
Get the ID of the security group for the EKS cluster
that matches the pattern eksctl-hive-mr3-cluster-ClusterSharedNodeSecurityGroup-*.
$ aws ec2 describe-security-groups --filters Name=vpc-id,Values=$VPCID Name=group-name,Values="eksctl-hive-mr3-cluster-ClusterSharedNodeSecurityGroup-*" --query "SecurityGroups[*].[GroupName,GroupId]"
[
    [
        "eksctl-hive-mr3-cluster-ClusterSharedNodeSecurityGroup-1QXZK1E200V1N",
        "sg-01dcfa3c9b45de646"
    ]
]

$ SGROUPALL=sg-01dcfa3c9b45de646
The user can find that two Auto Scaling groups are created.
$ aws autoscaling describe-auto-scaling-groups --region ap-northeast-2 --query "AutoScalingGroups[*].[AutoScalingGroupName]"
[
    [
        "eksctl-hive-mr3-nodegroup-mr3-master-NodeGroup-Z9O86XIXEAKD"
    ],
    [
        "eksctl-hive-mr3-nodegroup-mr3-worker-NodeGroup-1KIEI0COOI8PK"
    ]
]

In our example, the mr3-master node group starts with a single master node
whereas the mr3-worker node group starts with no node and can attach up to three nodes.
The user can verify that only the master node is available in the EKS cluster.
$ kubectl get nodes
NAME                                               STATUS   ROLES    AGE    VERSION
ip-192-168-63-86.ap-northeast-2.compute.internal   Ready    <none>   2m9s   v1.21.14-eks-ba74326
The user can get the public IP address of the master node.
$ kubectl describe node ip-192-168-63-86.ap-northeast-2.compute.internal | grep "IP: "

  InternalIP:   192.168.63.86
  ExternalIP:   3.38.103.92
Configuring Kubernetes Autoscaler
Open eks/cluster-autoscaler-autodiscover.yaml and change the configuration for autoscaling if necessary.
By default, the Kubernetes Autoscaler removes nodes that stay idle for 1 minute (as specified by --scale-down-unneeded-time).
$ vi eks/cluster-autoscaler-autodiscover.yaml

spec:
  template:
    spec:
      containers:
          command:
            - --scale-down-delay-after-add=5m
            - --scale-down-unneeded-time=1m
Start the Kubernetes Autoscaler.
$ kubectl apply -f eks/cluster-autoscaler-autodiscover.yaml
serviceaccount/cluster-autoscaler created
clusterrole.rbac.authorization.k8s.io/cluster-autoscaler created
role.rbac.authorization.k8s.io/cluster-autoscaler created
clusterrolebinding.rbac.authorization.k8s.io/cluster-autoscaler created
rolebinding.rbac.authorization.k8s.io/cluster-autoscaler created
deployment.apps/cluster-autoscaler created
The user can check that the Kubernetes Autoscaler has started properly.
$ kubectl logs -f deployment/cluster-autoscaler -n kube-system
...
I0819 07:44:54.409052       1 static_autoscaler.go:393] Scale down status: unneededOnly=true lastScaleUpTime=2022-08-19 07:44:04.308262622 +0000 UTC m=+0.347780313 lastScaleDownDeleteTime=2022-08-19 07:44:04.308262704 +0000 UTC m=+0.347780379 lastScaleDownFailTime=2022-08-19 07:44:04.308262782 +0000 UTC m=+0.347780458 scaleDownForbidden=false isDeleteInProgress=false
Directory for storing transient data
The user can use either EFS or S3 to store transient data. For using EFS, follow the instruction in 1. Creating and mounting EFS. For using S3, follow the instruction in 2. Using S3 instead of EFS.
For running Hive on MR3 in production, using EFS is recommended.
1. Creating and mounting EFS (efs/manifest.yaml)
The user can create EFS on the AWS Console.
When creating EFS, choose the VPC of the EKS cluster.
Make sure that a mount target is created for each Availability Zone.
Get the file system ID of EFS (e.g., fs-06326d8618a282ce5).
If the user can choose the security group for mount targets,
use the security group for the EKS cluster (in SGROUPALL).
Alternatively the user can create EFS using AWS CLI. Create EFS in the Availability Zone where Hive on MR3 is to run. Get the file system ID of EFS.
$ aws efs create-file-system --performance-mode generalPurpose --throughput-mode bursting --availability-zone-name ap-northeast-2a
...
    "FileSystemId": "fs-034995ac9c95a8861",
...

$ EFSID=fs-034995ac9c95a8861
Create a mount target using the subnet ID of CloudFormation eksctl-hive-mr3-cluster
and the security group ID for the EKS cluster.
Get the mount target ID which is necessary when deleting the EKS cluster.
$ aws efs create-mount-target --file-system-id $EFSID --subnet-id $SUBNETID --security-groups $SGROUPALL
...
    "MountTargetId": "fsmt-06b6172dec533e4b7",
...

$ MOUNTID=fsmt-06b6172dec533e4b7
After creating EFS,
get the address of EFS (e.g., fs-034995ac9c95a8861.efs.ap-northeast-2.amazonaws.com).
Open efs/manifest.yaml and update the following fields.
$ vi efs/manifest.yaml

data:
  file.system.id: fs-034995ac9c95a8861
  aws.region: ap-northeast-2
spec:
  template:
    spec:
      volumes:
      - name: pv-volume
        nfs:
          server: fs-034995ac9c95a8861.efs.ap-northeast-2.amazonaws.com
Execute the script mount-efs.sh to create a PersistentVolume.
$ ./mount-efs.sh
namespace/hivemr3 created
serviceaccount/efs-provisioner created
clusterrole.rbac.authorization.k8s.io/efs-provisioner-runner created
clusterrolebinding.rbac.authorization.k8s.io/run-efs-provisioner created
role.rbac.authorization.k8s.io/leader-locking-efs-provisioner created
rolebinding.rbac.authorization.k8s.io/leader-locking-efs-provisioner created
configmap/efs-provisioner created
deployment.apps/efs-provisioner created
storageclass.storage.k8s.io/aws-efs created
persistentvolumeclaim/workdir-pvc created
The user can find a new StorageClass aws-efs, a new Pod, and a new PersistentVolumeClaim (workdir-pvc).
$ kubectl get sc
NAME            PROVISIONER             RECLAIMPOLICY   VOLUMEBINDINGMODE      ALLOWVOLUMEEXPANSION   AGE
aws-efs         example.com/aws-efs     Delete          Immediate              false                  26s
gp2 (default)   kubernetes.io/aws-ebs   Delete          WaitForFirstConsumer   false                  42m

$ kubectl get pods -n hivemr3
NAME                               READY   STATUS    RESTARTS   AGE
efs-provisioner-688d7976d9-s6nl4   1/1     Running   0          52s

$ kubectl get pvc -n hivemr3
NAME          STATUS   VOLUME                                     CAPACITY   ACCESS MODES   STORAGECLASS   AGE
workdir-pvc   Bound    pvc-1d53fccf-2b94-40eb-aadc-287a4b25f112   1Mi        RWX            aws-efs        63s
2. Using S3 instead of EFS
Set the configuration keys hive.exec.scratchdir and hive.query.results.cache.directory in conf/hive-site.xml to point to the directory on S3 for storing transient data.
Note that we should use prefix s3a, not s3.
$ vi conf/hive-site.xml

<property>
  <name>hive.exec.scratchdir</name>
  <value>s3a://hivemr3-warehouse-dir/workdir/${user.name}</value>
</property>

<property>
  <name>hive.query.results.cache.directory</name>
  <value>s3a://hivemr3-warehouse-dir/workdir/${user.name}/_resultscache_</value>
</property>
Open env.sh and set the following two environment variables to empty values
because we do not use PersistentVolumes.
$ vi env.sh

WORK_DIR_PERSISTENT_VOLUME_CLAIM=
WORK_DIR_PERSISTENT_VOLUME_CLAIM_MOUNT_DIR=
Open yaml/metastore.yaml and comment out the following lines:
$ vi yaml/metastore.yaml

# - name: work-dir-volume
#   mountPath: /opt/mr3-run/work-dir/

# - name: work-dir-volume
#   persistentVolumeClaim:
#     claimName: workdir-pvc
Open yaml/hive.yaml and comment out the following lines:
$ vi yaml/hive.yaml

# - name: work-dir-volume
#   mountPath: /opt/mr3-run/work-dir

# - name: work-dir-volume
#   persistentVolumeClaim:
#     claimName: workdir-pvc
Access to the MySQL server for Metastore
Check if the MySQL server for Metastore is accessible from the master node. If the MySQL server is running on Amazon AWS, the user may have to update its security group or VPC configuration.
Configuring Metastore in env.sh
Open env.sh and
set the environment variable HIVE_DATABASE_HOST to the IP address of the MySQL server for Metastore.
In our example, the MySQL server is running at the IP address 3.36.101.45.
Set the environment variable HIVE_DATABASE_NAME to the database name for Metastore in the MySQL server.
Set the environment variable HIVE_WAREHOUSE_DIR to the S3 bucket storing the warehouse.
Note that we should use prefix s3a, not s3.
$ vi env.sh

HIVE_DATABASE_HOST=3.36.101.45
HIVE_DATABASE_NAME=hive3mr3
HIVE_WAREHOUSE_DIR=s3a://hivemr3-warehouse-dir/warehouse
If the user sets the environment variable HIVE_DATABASE_HOST to the host name of the MySQL server (instead of its IP address),
the user should update: 1) the spec/template/spec/hostAliases field in yaml/metastore.yaml and yaml/hive.yaml,
and 2) the configuration key mr3.k8s.host.aliases in conf/mr3-site.xml.
Checking configurations for MR3
For conf/core-site.xml and conf/mr3-site.xml, the user should use the default values for all configuration keys.
There are three configuration keys that the user may want to update.
-
mr3.k8s.pod.worker.hostpathsinconf/mr3-site.xmlis set to/ephemeral1because the instance typem5d.xlargefor worker nodes is equipped with a single local disk mounted on the directory/ephemeral1. If the user uses different instance types with multiple local disks, thepreBootstrapCommandsfield of the node groupmr3-workershould be expanded to mount all local disks and the configuration keymr3.k8s.pod.worker.hostpathsshould include additional directories. -
Since the Kubernetes Autoscaler is configured to remove nodes that remain idle for 1 minute for fast scale-in,
mr3.auto.scale.in.grace.period.secsinconf/mr3-site.xmlis set to 90 seconds (60 seconds of idle time and extra 30 seconds to account for delays). If the user wants to increase the value of--scale-down-unneeded-timeineks/cluster-autoscaler-autodiscover.yaml, the configuration keymr3.auto.scale.in.grace.period.secsshould be adjusted accordingly. -
mr3.auto.scale.out.grace.period.secsinconf/mr3-site.xmlshould be set to a sufficiently large value so as to prevent MR3 from prematurely cancelling the provisioning of worker nodes. For example, if it takes about 3 minutes to create and initialize a new worker node,mr3.auto.scale.out.grace.period.secscan be set to 300 (equivalent to 5 minutes). For more details, see Autoscaling.
Configuring Metastore
Open conf/hive-site.xml and update configurations for Metastore as necessary.
Below we list some of configuration keys that the user should check.
The two configuration keys javax.jdo.option.ConnectionUserName and javax.jdo.option.ConnectionPassword should match
the user name and password of the MySQL server for Metastore.
$ vi conf/hive-site.xml

<property>
  <name>hive.metastore.db.type</name>
  <value>MYSQL</value>
</property>

<property>
  <name>javax.jdo.option.ConnectionDriverName</name>
  <value>com.mysql.cj.jdbc.Driver</value>
</property>

<property>
  <name>javax.jdo.option.ConnectionUserName</name>
  <value>root</value>
</property>

<property>
  <name>javax.jdo.option.ConnectionPassword</name>
  <value>passwd</value>
</property>

<property>
  <name>hive.security.metastore.authenticator.manager</name>
  <value>org.apache.hadoop.hive.ql.security.HadoopDefaultMetastoreAuthenticator</value>
</property>

<property>
  <name>hive.security.metastore.authorization.manager</name>
  <value>org.apache.hadoop.hive.ql.security.authorization.DefaultHiveMetastoreAuthorizationProvider</value>
</property>
By default, Metastore does not initialize schema.
In order to initialize schema when starting Metastore, update yaml/metastore.yaml as follows:
$ vi yaml/metastore.yaml

spec:
  template:
    spec:
      containers:
        args: ["start", "--kubernetes", "--init-schema"]
Docker image
We use a pre-built Docker image
(ex. mr3project/hive3:1.11 for Hive 3 on MR3 and mr3project/hive4:4.0.0 for Hive 4 on MR3).
If the user wants to use a different Docker image,
check the environment variables DOCKER_HIVE_IMG and DOCKER_HIVE_WORKER_IMG in env.sh
and the field spec/template/spec/containers/image in yaml/metastore.yaml and yaml/hive.yaml.
$ vi env.sh

DOCKER_HIVE_IMG=mr3project/hive3:1.11
DOCKER_HIVE_WORKER_IMG=mr3project/hive3:1.11
$ vi yaml/metastore.yaml

spec:
  template:
    spec:
      containers:
      - image: mr3project/hive3:1.11
$ vi yaml/hive.yaml

spec:
  template:
    spec:
      containers:
      - image: mr3project/hive3:1.11
Running Metastore and HiveServer2
Depending on the characteristics of datasets and queries, the user may have to change configurations for Hive on MR3 before running Metastore and HiveServer2. Here are a couple of examples.
- Change resources to be allocated to each mapper, reducer, and ContainerWorker by updating
conf/hive-site.xml. In particular, the configuration keyshive.mr3.all-in-one.containergroup.memory.mbandhive.mr3.all-in-one.containergroup.vcoresshould be adjusted so that a ContainerWorker can fit in a worker node. For example, we can use the following values for worker nodes of instance typem5d.xlarge.$ vi conf/hive-site.xml <property> <name>hive.mr3.map.task.memory.mb</name> <value>3000</value> </property> <property> <name>hive.mr3.map.task.vcores</name> <value>0</value> </property> <property> <name>hive.mr3.reduce.task.memory.mb</name> <value>3000</value> </property> <property> <name>hive.mr3.reduce.task.vcores</name> <value>0</value> </property> <property> <name>hive.mr3.all-in-one.containergroup.memory.mb</name> <value>14000</value> </property> <property> <name>hive.mr3.all-in-one.containergroup.vcores</name> <value>3</value> </property>For more details, see Performance Tuning.
- Change the parameters for accessing S3
to avoid
SdkClientException: Unable to execute HTTP request: Timeout waiting for connection from pool. For more details, see Troubleshooting.
The user can start Metastore by executing the script run-metastore.sh.
After a Metastore Pod is created,
the user can start HiveServer2 by executing the script run-hive.sh.
$ ./run-metastore.sh
Error from server (AlreadyExists): namespaces "hivemr3" already exists
...
configmap/client-am-config created
statefulset.apps/hivemr3-metastore created
service/metastore created

$ ./run-hive.sh
...
deployment.apps/hivemr3-hiveserver2 created
service/hiveserver2 created
HiveServer2 creates a DAGAppMaster Pod. Note, however, that no ContainerWorkers Pods are created until queries are submitted. Depending on the configuration for readiness probe, HiveServer2 may restart once before running normally. In our example, HiveServer2 becomes ready in 60 seconds.
$ kubectl get pods -n hivemr3
NAME                                   READY   STATUS    RESTARTS   AGE
efs-provisioner-688d7976d9-s6nl4       1/1     Running   0          59m
hivemr3-hiveserver2-769f575878-m57h8   1/1     Running   0          62s
hivemr3-metastore-0                    1/1     Running   0          97s
mr3master-3983-0-84c7b6c7c5-2nw74      1/1     Running   0          46s
The user can check the log of the DAGAppMaster Pod to make sure that it has started properly.
$ kubectl logs -f -n hivemr3 mr3master-3983-0-84c7b6c7c5-2nw74
...
2022-08-19T08:48:53,996  INFO [DAGAppMaster-1-15] HeartbeatHandler$: Timeout check in HeartbeatHandler:Task
2022-08-19T08:48:54,017  INFO [K8sContainerLauncher-3-1] K8sContainerLauncher: Resynchronizing Pod states for appattempt_3983_0000_000000: 0
Configuring the LoadBalancer
Executing the script run-hive.sh creates a new LoadBalancer for HiveServer2.
Get the security group associated with the LoadBalancer.
If necessary, edit the inbound rule in order to restrict the source IP addresses
(e.g., by changing the source from 0.0.0.0/0 to (IP address)/32).

The LoadBalancer disconnects Beeline showing no activity for the idle timeout period, which is 60 seconds by default. The user may want to increase the idle timeout period, e.g., to 1200 seconds. Otherwise Beeline loses the connection to HiveServer2 even after a brief period of inactivity.
Running Beeline
To run Beeline, get the LoadBalancer Ingress of the Service hiveserver2.
$ kubectl describe service -n hivemr3 hiveserver2
Name:                     hiveserver2
Namespace:                hivemr3
Labels:                   <none>
Annotations:              <none>
Selector:                 hivemr3_app=hiveserver2
Type:                     LoadBalancer
IP:                       10.100.87.74
External IPs:             1.1.1.1
LoadBalancer Ingress:     a5002d0aff1bb4773aa04dc2bcc205bf-39738783.ap-northeast-2.elb.amazonaws.com
...
Get the IP address of the LoadBalancer Ingress.
$ nslookup a5002d0aff1bb4773aa04dc2bcc205bf-39738783.ap-northeast-2.elb.amazonaws.com
...
Non-authoritative answer:
Name:	a5002d0aff1bb4773aa04dc2bcc205bf-39738783.ap-northeast-2.elb.amazonaws.com
Address: 3.36.135.212
Name:	a5002d0aff1bb4773aa04dc2bcc205bf-39738783.ap-northeast-2.elb.amazonaws.com
Address: 13.124.55.22
In this example, the user can use 3.36.135.212 or 13.124.55.22 as the IP address of HiveServer2 when running Beeline.
This is because Beeline connects first to the LoadBalancer, not directly to HiveServer2.
Here is an example of running Beeline using the address of 13.124.55.22
on another machine where the script hive/run-beeline.sh is installed.
$ hive/run-beeline.sh --tpcds
...
Connecting to jdbc:hive2://13.124.55.22:9852/;;
Connected to: Apache Hive (version 3.1.3)
Driver: Hive JDBC (version 3.1.3)
Transaction isolation: TRANSACTION_REPEATABLE_READ
Beeline version 3.1.3 by Apache Hive
0: jdbc:hive2://13.124.55.22:9852/>
After running a few queries, new worker nodes are attached and ContainerWorker Pods are created.
In our example, the EKS cluster ends up with three worker nodes.
The last ContainerWorker Pod stays in the state of Pending
because the number of worker nodes has reached its maximum (3 in our example) and no more worker nodes can be attached.
$ kubectl get pods -n hivemr3
NAME                                   READY   STATUS    RESTARTS   AGE
efs-provisioner-688d7976d9-s6nl4       1/1     Running   0          62m
hivemr3-hiveserver2-769f575878-m57h8   1/1     Running   0          4m11s
hivemr3-metastore-0                    1/1     Running   0          4m46s
mr3master-3983-0-84c7b6c7c5-2nw74      1/1     Running   0          3m55s
mr3worker-9649-1                       1/1     Running   0          113s
mr3worker-9649-2                       1/1     Running   0          113s
mr3worker-9649-3                       1/1     Running   0          113s
mr3worker-9649-4                       0/1     Pending   0          113s
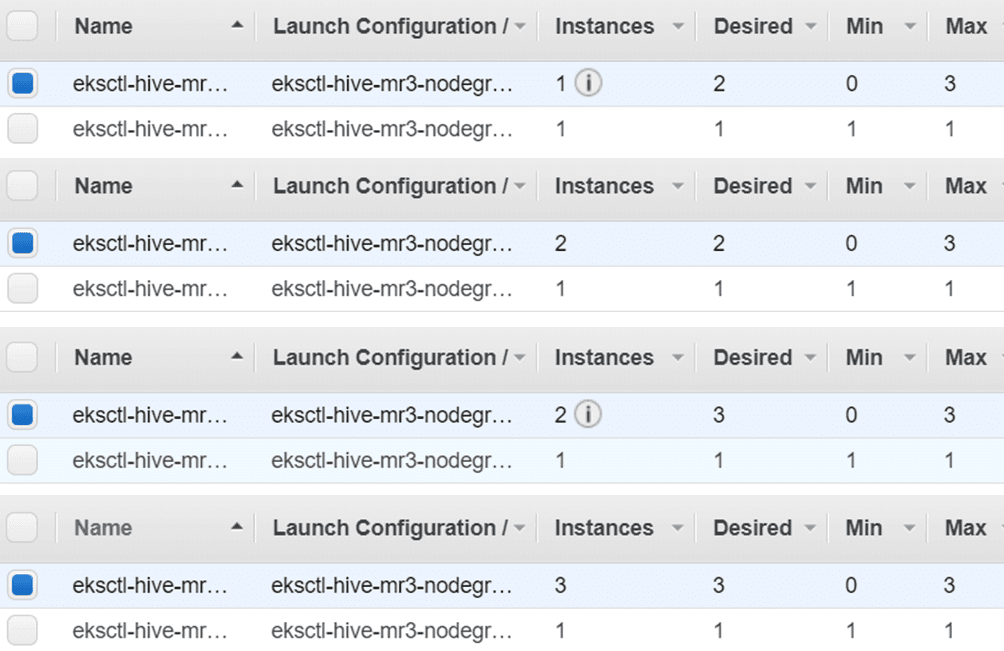
Here is the progress of scale-out operations
when the configuration key mr3.auto.scale.out.num.initial.containers is set to 1
in conf/mr3-site.xml:
Here is the progress of scale-in operations:
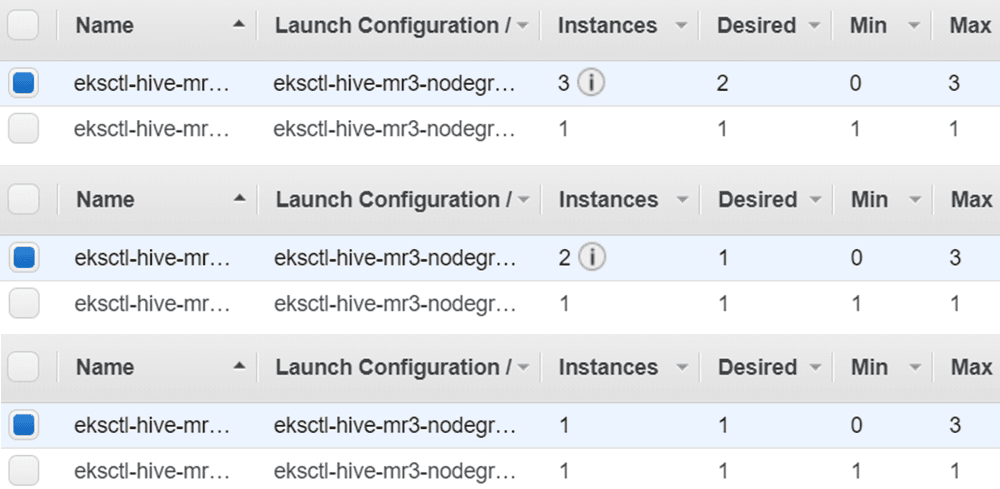
Note that the EKS cluster does not remove all worker nodes
because the configuration key mr3.auto.scale.in.min.hosts in mr3-site.xml is set to 1,
which means that no scale-in operation is performed if the number of worker nodes is 1.
The user can check the progress of autoscaling from the log of the DAGAppMaster Pod.
$ kubectl logs -n hivemr3 mr3master-3983-0-84c7b6c7c5-2nw74 -f | grep -e Scale -e Scaling -e average
Deleting the EKS cluster
Because of the additional components configured manually,
it take a few extra steps to delete the EKS cluster.
In order to delete the EKS cluster (created with eksctl), proceed in the following order.
- Stop HiveServer2, DAGAppMaster, and Metastore.
$ kubectl -n hivemr3 delete deployment hivemr3-hiveserver2 deployment.apps "hivemr3-hiveserver2" deleted $ kubectl delete deployment -n hivemr3 mr3master-3983-0 deployment.apps "mr3master-3983-0" deleted $ kubectl -n hivemr3 delete statefulset hivemr3-metastore statefulset.apps "hivemr3-metastore" deleted - Delete all the resources for Hive on MR3.
$ kubectl -n hivemr3 delete configmap hivemr3-conf-configmap client-am-config mr3conf-configmap-master mr3conf-configmap-worker $ kubectl -n hivemr3 delete svc --all $ kubectl -n hivemr3 delete secret env-secret hivemr3-keytab-secret hivemr3-worker-secret $ kubectl -n hivemr3 delete serviceaccount hive-service-account master-service-account worker-service-account $ kubectl -n hivemr3 delete role hive-role master-role worker-role $ kubectl -n hivemr3 delete rolebinding hive-role-binding master-role-binding worker-role-binding $ kubectl delete clusterrole node-reader $ kubectl delete clusterrolebinding hive-clusterrole-binding - Delete the resources for EFS.
$ kubectl delete -f efs/service-account.yaml $ kubectl delete -f efs/workdir-pvc.yaml $ kubectl delete -f efs/manifest.yaml $ kubectl delete -f efs/rbac.yaml - Delete the namespace
hivemr3.$ kubectl delete namespace hivemr3 - If EFS was created, remove the mount target for EFS.
$ aws efs delete-mount-target --mount-target-id $MOUNTID - If EFS was created, delete EFS.
$ aws efs delete-file-system --file-system-id $EFSID - Stop Kubernetes Autoscaler
$ kubectl delete -f eks/cluster-autoscaler-autodiscover.yaml - Delete EKS with
eksctl.$ eksctl delete cluster -f eks/cluster.yaml ... 2022-08-19 17:56:04 [✔] all cluster resources were deleted
If the last command fails, the user should delete the EKS cluster manually. Proceed in the following order on the AWS console.
- Delete security groups manually.
- Delete the NAT gateway created for the EKS cluster, delete the VPC, and then delete the Elastic IP address.
- Delete the LoadBalancer.
- Delete IAM roles.
- Delete CloudFormations.
